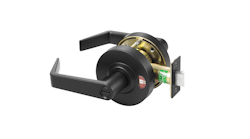
The Arrow APL Series cylindrical indicator lever lock is an ideal solution for commercial restroom doors. This lock is ready to install, right out of the box, and will hold up to high-traffic use. Key features of this lock include:
- Ideal for retrofit applications
- Grade 1 commercial hardware for durability
- Three-year mechanical warranty
- ANSI/BHMA 156.2 Grade 1, UL listed
- ANSI F76A function to prevent unoccupied lockouts
- Americans with Disabilities Act compliant
- Four available finishes: Satin Chrome, Bright Brass, Dark Oxidized Satin Bronze equivalent and Black Suede Powder Coat
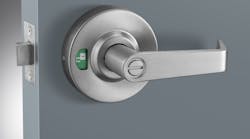
The visual indicators can be found on the rose. A red, locked padlock signals that the room is occupied, and a green, unlocked padlock icon signals that the room is unoccupied. (Photos 1 and 2)
Installation
The installation is straightforward. The only tool needed to install the lock is a Phillips head screwdriver.
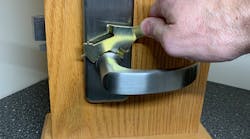
The lock comes out of the box connected as one piece. The first step is to separate the pieces. Start on the side that doesn’t have the rose (the non-indicator side). We’re going to push the supplied detent release tool right into that hole on the lever. All of this is now going to come apart and we can go ahead and begin the installation.
The first step is installing the latch. You’ll notice that there is no deadlatch on here because it’s simply privacy. We’re not going for security. We’re going for a handle that won’t turn when occupied, preventing someone else from coming in, but it’s not locked with a key for security. You also have that visual indicator, but in case they miss that visual indicator, if they pull down on the lever, it’s not going to let them in.
However, in the case that somebody locks themselves in or becomes ill and needs assistance, there is the option to unlock from the outside using a flat-head screwdriver. The store staff or building management could unlock this if a child accidentally locked themselves in the restroom.
Locate the supplied latch, 2-3/4-inch backset for this installation but also available for 2-3/8-inch backet, heavy duty, and insert into the door . The side that has the ramp is the inside. Then locate the screw pack. For ease of installation, there are only four screws, two long and two short (Photo 6). You can’t put the long screws on the latch, so it’s obvious that you will use the two short screws here.
I recommend that you use a hand screwdriver to tighten down the latch. Some people like to use power drills. The problem with power drills is you can get a little carried away and start stripping out screws. Cross-threading and stripping the screws out is going to be greatly reduced when you use the hand screwdriver. It is not quite as fast or quite as fun, but it is definitely going to give you a better result. I like to snug one screw, tighten the other one down, and then come back and start pulling things into place.
Next, look and make sure the backset is correct. I can see that my latch catch is in place. That is going to slide into the groove. The latch is installed properly with the correct backset.
There should be two through-holes on the top and bottom. You also need to make sure that you have two grooves on the sides. They should be cut into your door if it’s a metal door or notched into your door if it’s a wood door. That accommodates a feature of the lock. Two little claws kind of stick out. They help stabilize the lock so it can’t get twisted off the door.
Next I’m going to take the body and the chassis of the lock. It’s going to slide directly into the groove. Everything should fit nice and flush.
If you see space around the edge, there’s probably a problem with how those little claws are aligning or how the holes are lined up. It should just slip right on, with maybe a little nudge. If it doesn’t go on smoothly, pull it back off the door and check that your prep is correct before you continue.
Now it’s time to install the backside. It has a little tab part that sticks out. That’s going to go towards the back so that the lever can go against it. It should slide right on. It sits nice and flat and flush.
Next, insert the remaining longer included screws and hand-tighten them. Remember, there are no extra screws so you must be careful not to over-tighten and strip them. Test as you tighten down and make sure you get a return from the latch. That’s very important.
The next step is very simple. The inside coverplate has little idents that line up with the indents on the lock body. Line them up and then you’ll see a little valley. All you have to do is push and rotate down. You’ll feel a couple clicks. Make sure that it’s twisted all the way down and it can’t come off.
Then we attach the lever. Simply push it on – no nuts, no bolts. It’s going to go over the detent that releases it and it’s going to hold everything. I’m going to give that lever a pull, and that tells me that the installation is now complete.
Operation
From the outside, the lock is currently green, indicating that it is unlocked and the room behind it is ready for use. When I push the inside lock button, the indicator on the outside changes automatically to red and the lever cannot be turned to open the door from the outside. It gives me both a visual indication and a physical indication that the room is occupied. When the person inside opens the door to go out, it reverts back to unlocked with the green indicator showing and the lever turning to open the door.
The ANSI F76A function means they have one motion for egress and the button will release when the door is closed. Therefore, unoccupied lockouts are prevented.
In the event that a child gets locked inside, management can take a flat head screwdriver or actually even a quarter and turn to release the latch. The store owner or building management does not have to keep track of keys for emergency entry.
This is a great setup. It’s Grade 1 hardware that’s going to last and hold up to abuse. It’s going to give your customers all the features they want in one easy-to-install package that looks great too.
Video: https://www.youtube.com/watch?v=YLJjkveoguo
Wayne Winton is the owner of Tri-County Locksmith Services, located in Glenwood Springs, Colorado. For more information, check out Wayne’slockshop.com and lockreference.com.


