How to Deploy a Key System the Right Way: Designing the System

This is the second in a five-part series focused on How to Deploy a Key System the Right Way. In the first article, we completed a Discovery exercise by defining the scope of our project, identifying stakeholders, laying out all activities to be completed and establishing a schedule. We also defined resources needed, established a process to manage change requests and explored risk mitigation.
In Part 2, with all stakeholders gathered together and working collaboratively, we will take pen to paper to 1) undertake a survey of door openings, 2) design our master key system, 3) consider key system customization options, and 4) devise a detailed project plan to get the work done.
Conduct a Site Survey of Door Openings
The success of any key system deployment rests on the accuracy of the details – including details on each and every door opening. This is where a site survey is critical. With the customer’s facility floor plans (ideally CAD-based) in hand, and knowledge of their existing door numbering methodology, the locksmith project manager must go door by door and capture details about each opening. Where does the opening live in the facility? Which department owns it? What are specifics of the door hardware, its frame and threshold? How many cylinders and locks does each opening have?
Before getting started, be sure to ask the customer how they would prefer this information be presented when it is complete. Is a spreadsheet sufficient? Do they require a specific format to facilitate importation into existing management software systems?
With this level of detail, you will be well equipped to map keys directly to their openings.
Preliminary Steps to Key System Design
By taking the time during the design phase to carefully plan your key system, you can increase your chances of having a highly effective system in place. Planning starts with an understanding that security and convenience are opposing forces: the more secure a system is, the less convenient; the more convenient, the less secure. Forging the proper balance between the two is critical.
A key system allows for various levels of restricted entry to different areas of a building or buildings, based on an individual’s responsibility in the organization. In essence, a key system enables two or more keys to open one lock.
When designing a successful system, be sure to structure the plan around your building or buildings and not your personnel. Think of building areas vs. job titles. Begin with a simple key system schematic which oftentimes resembles an organizational chart. Define departments, buildings or geographic areas. Don’t overlook the building’s core which includes stairwells, mechanical rooms and electrical, phone and HVAC areas.
Before we dive in to designing the key system, it’s important to begin with a review of terminology so everyone can communicate in similar terms.
Change Key – This key is also referred to as a sub-master key. It will open one lock and only locks that are the same. The lock that the change key opens will also open with the use of the master key, and any key above that rank.
Master Key (MK) – Without a master key, there is only one key for a lock. This is the necessary key to change a simple lock into a master keyed lock. In some systems, this will be the highest ranking key.
Grand Master Key (GMK) – A grand master key is used to access multiple master key systems. This key will open every master system under it, as well as the change keys under those systems.
Great Grand Master Key – The great grand master key will open all the grand master key systems under it, the master key systems under those, and the change keys under those. Theoretically, this system can continue until the locks become too complicated to function.
Step 1: Define your security objectives. How will your system balance security and convenience? As a best practice, structure your key system to achieve security objectives, not to provide convenience to keyholders.
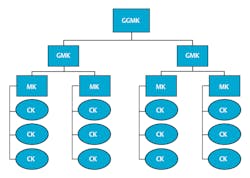
Step 2: Determine what level master key system is needed. Think of levels of keying as levels of authority in your organization. This plan will resemble a corporate organizational chart and the number of levels will depend on your building’s complexity. It may require anything from a simple two-level system with only change keys and master key, to a much more complex four-level system with change keys, master keys, grand master keys, and great grand master key, or any level in between.
Two-level System
Four-level System
Step 3: Assign key symbols. Use an alpha and/or numeric designation to properly identify the correct key combination for a door or group of doors. For security purposes, many master keying charts employ blind codes to identify individual change keys and master keys. To cut a key, the locksmith uses a chart or computer program to translate the blind code to a bitting code. The bitting code is used in conjunction with the key’s depth and spacing information to determine the key's specific geometry. Consider Customization Options
During the Design phase, the organization should consider options to customize the key system. How will keys be marked? What is the system for serialization to facilitate identification? Will the customer choose to have a blind code inscribed on all keys to enable manufacturers like Medeco to match a lost key with a database and quickly determine which organization the key belongs to? Will there be a custom die created with the organization’s logo? If so, bear in mind that keys are bound to be misplaced or lost, and, if a key is inscribed with a logo and lands in the wrong hands, it could pose a significant security risk.
Create a Detailed Work Plan
Now that you have outlined your key system, it’s time to determine how all of the work will be accomplished. It’s time to create a work plan. Begin with a three-column spreadsheet that details all tasks, the amount of time required to complete each task, and the owner or individual responsible to complete it.
Summarize Output of the Design Meeting
As the locksmith and de facto project manager, it’s important that you take responsibility to summarize and document all items agreed upon in the Design meeting, including the master key schematic and the project work plan. Be sure to distribute action items to individual owners and confirm next steps. Most importantly, make it a point to secure formal customer sign off on the keying schematic or key system design to ensure everyone is in agreement as the project moves forward.
Design Phase Highlights and Action Items
Site Survey:
· Ask the facility manager for a current set of floor plans. Having plans in hand facilitates location of openings.
· Does the customer have a door numbering system? If not, help them develop one.
· What is the scope of the site survey? What details are you required to capture for each opening?
· Digitize the survey data as much as possible. Digital tools like tablets and other mobile devices help organize data and facilitate interpretation and presentation later on.
Keying Conference and Customization:
· Establish “keying language and terminology” with the customer. This will help the customer understand the elements of their key system and will minimize confusion in the communication process.
· Manage the keying system to achieve security objectives, not for the convenience of key holders.
· The simpler the design – the better.
· After agreement, be sure the customer signs off on the key system layout and plan.
· Where available, leverage the key system manufacturer’s key system design tools and resources. Some manufacturers have online design tools and guides, and some even offer in-field master key system design consultation through Professional Services.
Scheduling the Work:
· Refer back to the scheduling plan developed earlier for important dates and deadlines.
· Capture all steps and action items required to complete the project.
· Calculate the duration of each activity and assign the appropriate resource(s).
· Document and digitize the project plan.
In the next article, we’ll explore Phase 3 of How to Deploy a Key System the Right Way – the Development phase.
Dale L. Bowman
Dale L. Bowman, CML, CPP, PSP, PCI, LEED BD+C, is Medeco’s director of business development, OEM and international sales.


