Video surveillance equipment can be an option to expand your business. The advent of wireless video cameras has eliminated the need to run wiring from the cameras to the video recorder or monitoring system for many residential applications.
Digital Wireless Surveillance Sets from ABUS provide opportunities for locksmiths who are interested in becoming involved in this expanding market without having to run wiring. The only wiring required for wireless cameras is for the power source, which can be a plugged into an existing 120VAC outlet. They are fully Plug-and-Play, meaning you mount the devices and switch them on, and they are automatically connected.
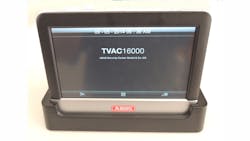
For this article, we will discuss the ABUS 7" Video Surveillance Set, Model TVAC16000C. This ABUS video surveillance system includes a seven-inch touchscreen monitor with integrated speakers, a docking base, Ethernet cable and power supply, and an infrared (IR) outdoor 2.4 GHz wireless bullet style video camera with antenna and power supply.
The 7" color touchscreen monitor controls all of the operations: set-up, camera choices, recording options and playback. The LCD screen resolution is 800 x 480 pixels. The battery powered monitor has a 1.5-hour battery life when not mounted onto the docking station. The live view resolution of one camera is 480 by 320 pixels.
The included weather resistant, ABUS TVAC16010C camera has a 3.6 mm lens with a 60-degree horizontal by 43-degree vertical angle of view. The outdoor camera mechanism is mounted into an IP66 rated enclosure that protects the contents against water projected in powerful jets. The IP66 rating does not protect against immersion and continuous submersion. The camera’s ¼" image sensor has resolution up to 640 x 480 (~307,200 pixels), the equivalent of VGA (Video Graphics Array). The camera is equipped with 25 infrared LEDs for night vision recording. For nighttime surveillance, infrared recording is approximately 16 to 26 feet.
The integrated digital transmitter within the video surveillance camera provides wireless, encrypted transmission of video stream and audio stream to the monitor. To record video, an SD Card must be inserted into the card slot in the monitor. The TVAC16000C can accommodate up to a 32GB SDHC card.
Important: Always turn off monitor before removing the SD Card.
The ABUS Video Surveillance monitor records in the AVI (Audio Video Interleaved) multimedia file format that allows synchronous audio-with-video playback. The AVI format divides a file's data into blocks (chunks). An AVI file may carry audio-with-visual data inside the chunks in different compression schemes including H.264 and MPEG4. To view videos on a Windows based personal computer, use a playback program such as Windows Media Player or Quick Time Player.
The ABUS TVAC16000C uses H.264 video compression format when streaming images from the camera. The H.264 format produces digital compressed video at a low bit-rate for Internet streaming applications with nearly lossless coding. With H.264, the bit rate savings can be 50 percent or more. This means significantly less network bandwidth and storage space are required for a video file resulting in better network transmission. A much higher video quality can be achieved for a given bit rate, resulting in more efficient mobile surveillance application and viewing. The 7" LCD touchscreen monitor controls and records up to four TVAC16010C video surveillance cameras.
Prior to operation, the monitor’s rechargeable batteries must be charged for at least eight hours. To charge the battery, the monitor must be in the docking station with the power supply connected to the docking station or the monitor must be connected directly to the power supply. The monitor must be in the docking station for an ABUS app-equipped smart phone to view live images from the cameras.
Suggestion: Charging the monitor prior to going to the customer's residence will permit the installation to take place at one time.
Determining the location for the monitor/docking station is extremely important. The docking station must be located close to a 120VAC power source, an Ethernet connection and, if possible, centrally located to the cameras.
To prepare the monitor for recording, begin by setting the time zone and the time, inserting an SD Card, and selecting and activating the cameras. For this article, we have one camera. The recording setup and the network setup can be completed after the cameras are configured and positioned.
To record, the docking station must be within range of all cameras. For this reason, it is extremely important to test the reception signal for sufficient strength for each camera prior to installation. A reception icon appears in the monitor adjacent to the record icon. For a one-camera installation, the reception icon appears in the top right corner of the display.
The ABUS Video Surveillance Set incorporates wireless cameras that must be located within range of the monitor. The range varies depending upon obstructions between each camera and the monitor. When there are no obstructions, the maximum "clear line of site" in optimal conditions is 325 feet. However, the actual range will be considerably less because of interior and exterior walls, metal construction and appliances, external interference, etc. Indoors in normal conditions, the range is up to approximately 120 feet.
When one camera is connected to the monitor, the video stream is recorded at a resolution of 480 x 272. According to ABUS, at this resolution, the recording time is approximately 200 minutes per GB. Up to four outdoor 2.6 GHz, infrared TVAC16010C video cameras can be viewed and recorded in the 4X camera view. If more than one camera is operating, the recording resolution QVGA (Quarter Video Graphics Array) is at 320 x 240 (~76,800 pixels). When more than one camera is recording, the audio recording is disabled. At this resolution, the recording time is approximately 130 minutes per GB per camera.
The positioning of each camera depends upon the image the end user expects to view. What are the end users' expectations? Is the image the camera is producing going to satisfy the end user? Discuss with the end user to ensure the images produced meet their expectations.
If the camera is being used for a scenery image, the distance from the camera to the object is not as critical as if the camera is displaying details (close-up). For example if the camera is positioned far from a gate, you can see if a person enters or leaves. If you want to determine who the person is, the camera must be located closer and at an angle where the face can be seen for more than just a moment.
To temporarily set up each camera location, use a stepladder, a plastic clamp and extension cord. Position one of the cameras in the general location that is within proximity of a 120VAC duplex outlet. Clamp the camera base to the stepladder. This gives a reasonable height for each camera.
Turn on the camera and check the reception icon to be certain the reception of the monitor in the docking station is sufficient. If four or five bars are lit, reception is strong. If not consider moving the monitor/docking station or the camera. Once a sufficient number of bars are lit, bring the monitor to the camera to make fine adjustments. Have the owner view the monitor to see what’s being recorded. When the end user is satisfied, record a two minute sample. Repeat this procedure for each camera.
There are different ways to activate the camera's recording function using the monitor. The recording functions are motion detection, timed and manual. Motion detection choices are high, low or off. When a camera is set to motion detection, recording will begin when motion is detected within the image. Once recording begins, the camera will record for two minutes, then shut off. If motion is detected, it will start to record for another two minutes. The lag time between recordings is approximately five seconds.
A timed recording starts and stops at specific times, on a specific date. Up to five different timed recordings can be programmed. A specific camera must be selected to record. Once the timed recording has been completed, the symbol for recording appears.
Manual recording occurs when REC symbol on the display is pressed. When recording, the camera status button flashes red. To end recording, press the REC symbol again. When not recording, the recording symbol is constant red.
Recording will stop when the SD Card is full unless cyclic recording is selected, which is endless recording by overwriting older recordings is activated.
Important: To record video and audio, the monitor does not have to be in the docking station. However, it must be sufficiently charged to ensure loss free recording.
When the monitor has been configured, the images are displayed on the monitor. Each camera can be viewed individually or in the QUAD (four sections) configuration incorporating up to four cameras. In the single camera mode, pressing on the display's magnifying glass will divide the image into five fields. Pressing on one of the marked fields magnifies this portion of the image. To return to the single view, press the full screen symbol.
After two minutes in single view when two or more cameras are functioning, the display will automatically switch to QUAD, viewing the video stream from up to four cameras.
The docking station is the primary location for the monitor as the batteries are charged and the monitor must be in the docking station for Internet access. The monitor can be operated separate from the docking station for approximately one and one -half hours between charges.
Once the system is operational, the final steps are setting up the recording specifics and connecting to the Local Area Network (LAN). Connecting to the Internet enables mobile access using a smart phone. Download the ABUS Live View app to view camera output. The monitor must be in the docking station for an ABUS app-equipped smart phone to view live images from the cameras. The live view resolution and frame rate of the smart phone is 320 x 240 pixels with up to 15 frames per second (depending upon the Internet connection).
For this article, I used my dogs' bed and her food/water stand as my focal point for the wireless camera. I chose a duplex outlet that allowed direct view of the surveillance area. Since the camera and monitor/docking station were in close proximity, the reception icon indicated excellent reception.
I set the camera to motion detection recording to "see" what Kanga, our dog, does when we are not home. The monitor recorded about a dozen two-minute segments. As we thought, she slept most of the time, activating the recording mechanism when she would get up to drink water or have an active dream.
Here is some additional information regarding the ABUS Video Surveillance Set. The power switch on the monitor requires you to press and hold the on/off button a few seconds when turning on the monitor. Once powered, press the on/off for a few seconds to turn off the monitor. However, if you press and release the on/off button, the monitor enters the Live View/energy savings mode. To return to the operating mode, press and release the on/off button again.
According to ABUS, the monitor and cameras are bound to each other. The monitor cannot be operated with other cameras and vice versa. Internet access permits live view, with the ability to change between cameras on a smart phone.
Set-up was very easy. When I powered the monitor and then the camera, the camera was already paired to the monitor. The act of pairing interconnects the camera to the monitor, which can then be controlled by the monitor. Setting the method of recording is straightforward. Installation videos are available.
For more information, contact your local locksmith distributor or ABUS USA LLC at Telephone 623-516-9933 Web Site: www.abus.com/us/Home-Security/Video-Surveillance. Press the FAQ button to navigate to installation videos.


