Installation of mortise locks onto wood doors is a time honored and time consuming tradition. Mortise locks were introduced about two centuries ago, when doors became thick enough to accommodate the lock within the door. The mortise lock provided an additional level of security, convenience, and aesthetics. Over the years, mortise locks have provided a solid, secure feel to the person who opened the door.
Today, there are mortise locksets designed for commercial, institutional, and residential applications. For the commercial/institutional market, wood doors and mortise locks are an instant sign of success, even before entering the building or office. The same can be said for residential applications. With the seemingly continuous increase in home values, more homeowners are spending more money upgrading their residences.
To satisfy their appetite for the very visual appeal of a wooden door/mortise handle lock, lock manufacturers are producing new, more decorative designs of mortise lock trim. For the security aspect, they are also introducing new functions that can be combined with higher and high security lock mechanisms. For these and other reasons, upgraded natural wood finished front doors and mortise locksets have become very popular.
On the other hand, installing a mortise lock into a new natural wood finished door is time consuming and requires accurate measurements and exacting implementation. Note: you cannot repair a mistake in a stained wood door as easily as you can on a painted door.
There are several ways to install a mortise lock into a wood door. One choice is ordering the door pre-mortised for the job, something that in my experience is not often done because the choice of the mortise lock and trim are required prior to ordering the door. The second way is to install the mortise lock using a drill motor, bits, hammer and chisels. This is the most common method, not the more efficient method. The third method is to use a mortiser. This tool simplifies the mortising procedure by controlling the cutting required for the mortise pocket.
For the purpose of this article, we will mortise an opening into a 1-3/4” thick composite core door. A composite core door has veneer faces, solid wood rails and stiles. The content of the core is composed of wood material in an adhesive mixture. Installing a mortise in a composite core door is easier than installing a mortise into a solid wood door.
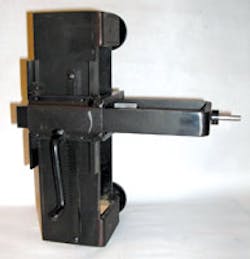
For this installation, we will use the Major Manufacturing HIT-38 Speed Mortiser, which can cut a 3/4”, 7/8” or 1” wide mortise, up to 4-1/2” deep, by approximately 6-3/4” tall. The HIT-38 Speed Mortiser is designed to create the mortise in 1-3/8” or 1-3/4” thick doors.
IMPORTANT: When using any power tool, be sure to wear eye protection, hearing protection, and at a minimum a dust mask.
When cutting the mortise.
- Make sure the door is vertical and secured. A loose door can become damaged.
- Measure the height, width and thickness of the mortise lock body.
- The mortise lock latch and/or dead bolt should align with the existing strike plate opening(s).
- Measure at least twice and cut the mortise only once. Remember to add space between the finished floor and the bottom of the door.
- A sharp bit will cut smoother and the results will look more professional.
Step 1. Secure the door in the vertical position.
Step 2. Determine the location for the mortise using the manufacturer’s template. Mark the top and bottom.
Step 3. Mount the Speed Mortiser body onto the lock edge of the door with the mounting knobs on the right and the crank handle on the left. Just snug the mortiser body onto the door.
Note: If you are mortising a pocket into a 1-3/8” thick door, mount the mortiser with the knobs on the left and the crank handle on the right.
Step 4. Slide the yoke legs into the carriage slots on the mortiser body. Rotate the crank handle until the cutter is at the bottom position.
Step 5. Loosen the mounting knobs and adjust the mortiser body so the cutter is in line with the bottom position of the template. Tighten the mounting knobs. Do not over tighten the mounting knobs; that can damage the door face.
Step 6. Rotate the crank handle to raise the cutter to be certain the mortise can be cut.
Step 7. Attach a drill motor whose speed is capable of drilling into wood.
Step 8. Drill the bottom hole to depth. Continuously clean the debris out of the hole.
Note: Maintain firm control of the carriage crank handle when drilling. I recommend having one hand on the crank handle at all times.
Step 9. Raise the cutter to the top and drill this hole to depth. Clean the debris out of the hole.
The next series of steps are to drill the in between holes, leaving a minimum of amount of webs, while having sufficient surface area for the cutter to ride on. Major Manufacturers recommend drilling the intermediate holes from the bottom up. A web is the material remaining between the two overlapping cuts.
Step 10. Drill the next hole overlapping the bottom hole. Make certain that there is at least enough wood for the point of bit seat. Clear out the debris.
IMPORTANT: When drilling the holes, do not crank up and down and in and out at the same time.
Step 11. Continue to overlap the holes until all the in between holes have been drilled. Clear the debris out of the opening.
Step 12. Move the cutter to the bottom. Drill out the webs from the bottom to the top moving the cutter slowly. Advance the cutter approximately one-half inch or less per pass. Clear out the debris.
Step 13. After the webs have been removed, clean up the side of the mortise by running the bit slowly up and down and in and out of the mortise pocket.
For this article, drilling out the mortise pocket required less than 15 minutes.
Clean out the mortise pocket and check to be certain the mortise lock body will fit into the opening. The remaining steps to the installation are to chisel out the mortise lock front and drill the openings for the trim.
Prepping the door for a mortise lock using the Major Manufacturing HIT-38 Speed Mortiser can save time and ensure an accurate, clean installation. The HIT-38 Speed Mortiser has a one year limited warranty against manufacturer’s defects.
For more information on the HIT-38 Speed Mortiser, contact your local locksmith wholesaler or Major Manufacturing, Inc., 1825 Via Burton, Anaheim, CA 92806. Telephone: 714-772-5202. Fax: 714-772-2302. Web Site: www.majormfg.com.


