Passive security has an important defensive function in securing entryways because it helps protect against forcible entry. An intruder seeking to forcibly gain entry will, in most cases, choose to attack the entryway using tools such as: lock picks, drills, pry bars, or blunt objects. In October 2014, I wrote about the role of security strike plates in a passive security plan. This month I’d like to expand on passive security by writing about the role of Latch Protectors, their function in a passive security plan, and how the suggestions and installation of these products can strengthen the relationship with the property manager or owner.
People generally fall into one of two personality categories: Proactive and Reactive. Many times the property manager or owner’s motivation for proactive security solutions is triggered by a change in management or an overall upgrade in infrastructure. Security solutions for reactive property managers and owners are traditionally delivered after the fact, typically when the property has been compromised, goods stolen, or forced entry has been attempted. Unfortunately, this is a concept that security professionals are all too familiar with.
Whether the customer is proactive or reactive, passive security solutions can be easily integrated into a larger plan of action. The plan is composed of all options to secure the entryways and overall property. Meeting with the property manager or owner provides a great opportunity to suggest passive security options, like latch protectors, when management is already in the security mindset. These impulse add-ons can both strengthen the relationship with the client while at the same time increase billable time.
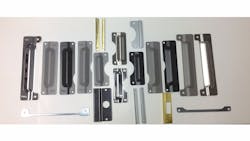
While security strike plates are designed to provide additional reinforcement around the extended latch or deadbolt on the jamb side of the entryway, latch protectors are designed to protect the latch or deadbolt from physical forcible manipulation. Pairing security strike plates and latch protectors provide low cost security solutions while at the same time reinforcing entryways.
Latch Protectors provide a physical barrier to deter forced entry through kick-ins, door prying, jamb spreading, and other actions intended to defeat the locking device. Latch Protectors are made from either a stainless steel or a cold-rolled steel base material and undergo a finishing process to achieve the desired finish for the customer. Entry Armor finishes include aluminum, antique brass, mirrored brass, mirrored chrome, Duronodic, and stainless steel.
Latch Protectors are a relatively low-cost solution that provides an extra level of security for the latch and deadbolt. There is not necessarily a one-size-fits-all solution when it comes to latch protectors. Each entryway can be uniquely different and it is recommended to look for the following components of the entryway and latch protector product when choosing the correct latch protector solution:
- Door type
- Swing of the door
- Surface area needed to be covered,
- The offset between the door and the frame
- Any obstacles that could hinder the door from closing properly.
A segment of security lock hardware has grown considerably in size over the years. The larger sized hardware may pose a security threat in the door entry access point because many traditional latch protectors are not large enough to accommodate many newer hardware models. This poses a real problem to any passive security plan. Entry Armor’s™ elongated ELP-240 series Latch Protectors overcome these obstacles because the product features up to a 17 percent increase in the cutout relief over traditional latch protectors. This beneficial solution will fit the widest array of commercial hardware providing the added security and reinforcement that is needed in commercial applications.
Additionally, Latch Protector installation can sometimes be difficult because many times there is a height or offset adjustment that needs to be made between the door and the frame to ensure a proper fit. Sometimes a latch protector cannot be installed because the plane of the door does not align with the plane of the frame.
Entry Armor™ has solved this problem by providing a patent pending spacer with a variety of latch protectors. The spacers are installed between the door and the latch protector to reduce the. This may reduce compromising the security of the entryway while providing accurate, easier installations that will save both time and money in the installation process. This solution allows latch protectors to be installed on the segment of doors where traditional latch protectors could not be installed, resulting in a more secure property. There may be an installation that does not require a spacer; however, another job may need more than one depending on the construction of the entryway. Spacers are also available separately.
Many times a higher level of security is needed for specific entryways. Entry Armor™ has security options to provide the property manager or owner an added benefit and reduce the chance of compromising entry access.
These security options are:
Level 3 Security: Offers a commercial grade security to deter forced entry.
Level 2 Security: Features 1 Anti-Spread pin providing additional commercial grade security to deter forced entry and doorjamb separation.
Level 1 Security: Features 2 Anti-Spread Pins providing heavy-duty security to deter forced entry and doorjamb separation.
Anti-spread pins add another physical component to the latch protectors to further secure the area around the latch or deadbolt from physical manipulation. The higher security products take more time to install, which is a great way to increase billable services. The additional security option may strengthen the relationship with the customer by the value-added proposition.
In addition to the variety of length and width in Latch Protectors, Entry Armor™ offers a variety of latch protector solutions to accommodate:
- In-swinging doors
- Out-swinging doors
- Narrow Stile doors
- T Style
- Interlocking
- Rose Cutout
The ELP-240 Series is one of the most versatile and popular latch protectors. Let’s take a step-by-step look at how to install this product.
ELP-240 Series Installation
NOTE: Doors and frames vary. The distance or offset between the door and frame also varies. Entry Armor patent pending Spacers help with the height or offset adjustment between the door and frame for many Entry Armor Latch Protectors. Carefully consider your specific application including the amount of security desired, possible glass breakage, door construction, fasteners needed, aesthetics and lock hardware when choosing the Latch Protector that best fits your specific application.
1. Position the Latch Protector in the desired position on the door to ensure the latch or latches are securely covered. Close the door and check that the door will close properly once the Latch Protector is installed (Installation Photo 1).
2. Mark the holes for the bolts (Installation Photo 2).
3. Drill holes for the 5/16” bolts provided and attach the Latch Protector to the door. Depending on your application, you may need to provide other fasteners. (Installation photos 3 and 4).
If your Latch Protector hits or rubs on the frame or strike plate, a larger offset is needed between the Latch Protector and the frame. Spacers may be available from Entry Armor® depending on the Latch Protector that you selected. The custom spacers are placed between the door and the Latch Protector and in some cases, such as this one, may be stacked to increase the offset or distance between the Latch Protector and the frame (Installation photos 5 and 5A).
5. Align the square cut outs of the Latch Protector with the 5/16” holes in the door. Attach the bolts on the outside of the door and the adjustable acorn nuts on the inside of the door. Secure tightly (Installation photo 6).
6. Close the door and mark where the Anti-Spread Pin(s) hits the frame. Drill a hole in the frame so that the Anti-Spread Pin(s) will enter the hole when the door is closed. Commercial exterior frames may have concrete filled frames and a concrete drill bit may be helpful to drill this hole. Not all Latch Protector models are equipped with Anti-Spread Pin(s) (Installation photos 7 and 8).
TIP: It can be helpful to dab the Anti-Spread Pin(s) with lipstick so the color transfers to the doorframe. This will give an accurate placement of where to drill the Anti-Spread Pin hole(s).
Installation Photo 9 shows the complete installation.
Interlocking Latch Protectors are designed to provide additional security for commercial and residential in-opening doors. Available in both 7” and 12” lengths and 5/8” widths, these products provide extra security and are relatively easy to install. These latch protectors are idea for cash, computer, and accounting offices as well as in-opening garage doorways. Any in-opening entryway can benefit from this deterrent to tampering of the bolt and latch and is compatible with key-in-knob, deadbolts, and mortise locksets.
ELP-100/110 Series Installation
1. Place the “Frame Side Channel” (part with large screw holes) on the edge of the doorstop centered with the lock. Mark the location of the screw holes and drill 1/8” pilot holes. Install using the long screws provided (Installation photo 10).
2. Place the “Door Side Channel” inside the “Frame Side Channel”. Use a piece of foam to hold the two parts together in place or just hold in place with your hand
3. Close the door and using a pencil mark the door at the top of the channel (Installation Photo 11).
4. Open the door and place the “Door Side Channel” in place marking the screw locations. Drill 3/32” pilot holes and install using short screws
TIP: Install each side using one screw and check that the parts line up properly and that the door closes properly before drilling and installing all the screws.
Installation Photo 12 shows the completed installation.
For more information, contact Pro-Lok, 655 North Hariton Street, Orange, CA 92868. Web: PRO-LOK.com. Phone: 714-633-0681.


