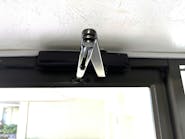
In this installation, we will cover how to remove the locking mechanism on a solid glass, Herculite-style door. The first step is to make sure you bring along a colleague. This is a two-person job.
Start out by focusing on the hinge at the top. There will usually be two Allen head screws on the front or the back side. The one in our example actually has the block on the side. When those come off, you will then have the stud mounted in the top of the door.
You’ll need glazer’s mitts to be able to hold and maintain the door. Always invest in high-quality glazer’s mitts to protect your hands. There’s a pump on the thumb side. You want to mount these fairly low, so you can use your legs to lift
Next, identify the bottom bearing or the bottom pivot post that will be mounted onto the floor. Make sure this is in good condition. This also carries and adjusts the height of the door itself. If you need to adjust the height of the door, you can do that using the right tools on that particular bearing.
Photo 7 shows the top pivot, mounted into the ceiling, and photo 8 shows where the opening failed and the customer used some duct tape to put that Herculite-style locking mechanism back into place. Obviously, we’re going to fix that.
We’ll start by removing the door, the duct tape and the locking mechanism, along with the cylinders. Have your associate stabilize the door for safety and make sure there are no onlookers around who could get injured.
When you pull the door down, you’ll see an entrance to the side of the Herculite-style lock. Take the two screws out. These are the mounting screws for the lock mechanism. You also have the set screws, the small black screws that have flat heads that align with the cylinders and hold the cylinders in place. (These are just like the set screws on a regular Adams Rite-style door, that would loosen up the cylinder.) You’ll need to loosen those and pull the cylinders out with an Allen head wrench.
This lock was damaged and needed to be replaced. The new lock is keyed on the outside with a thumbturn on the inside. We also switched it over to interchangeable core so we don’t have to do this again.
Always leave the new unit a little bit loose so you’ve got some room to move things around and align the hole up with the thumbturn and the cylinder. Test the locks several times after you put them back in service.
Once that lock cylinder has been replaced or repaired, or the locking mechanism has been replaced and repaired, we begin reversing the process, standing the door back up into its natural position, We put the bottom stud on first and make sure it is fully seated and fully in place. Next, we lock it in place by clamping it onto that top pivot.
Photo 17 is a closeup view of that mounting on the bottom bearing or bottom pivot and photo 18 shows what the accepting side looks like in the door. You can make adjustments on the cradle where the bearing goes into it.
In photo 19, the door is fully hung and ready to go back into service, fully functional. Job done!
Wayne Winton is the owner of Tri-County Locksmith Services, located in Glenwood Springs, Colorado. For more information, check out Wayne’slockshop.com and lockreference.com.
Wayne Winton
Wayne Winton is the owner of Tri-County Locksmith Services, located in Glenwood Springs, Colorado.


