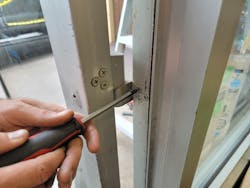
Today we are going to be installing an Ives geared continuous hinge for a commercial customer. This hinge job is a little different than some of the hinges that we’ve done. It still includes that lifetime warranty but it requires a slightly different installation process. Photo 1 shows the opening.
First, we take the screws out of the middle pivot hinge (Photo 2). We still have two remaining hinges to support the door – one on the top and one on the bottom. This lets us remove the middle hinges so they are completely out of the equation, and we can focus on the top and the bottom.
Next, it’s time to unbox the replacement hinge. Make sure you have the correct hinge. If you need a surface-mount hinge, make sure you have a surface-mount hinge. Sometimes the manufacturer or the supplier can send the wrong part out, so verify that first.
According to Ives, these geared continuous hinges are designed to last the life of a building by distributing the weight of a door along the entire length of its frame. The unique design reduces the high amount of stress normally associated at the top of the door and frame on butt hinge applications. Not only does this reduce hinge failure, but it also keeps a door in constant alignment, eliminating the chance of door sag. These characteristics make continuous hinges suitable for high-use and high-traffic doors.
The geared continuous hinge has no pin. Instead, these hinges utilize a single gear section for the leaf and a separate gear section for the frame side of the door. The two are held in place by a full-length cover channel and rotate on a series of bearings. The design of a continuous hinge eliminates the spacing between the hinges, which helps prevent fingers from being pinched, making it a safer device than traditional hinges. These benefits result in higher efficiency and less maintenance, maximizing the value of a door opening investment. For more information on the hinge, visit https://us.allegion.com/en/products/brands/ives/geared-continuous-hinges.html.
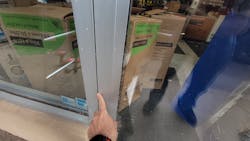
We also made sure the door was locked so that no one would accidentally try to use it while the installation was being completed.
Next, we’ll unbolt this middle hinge. (Photo 3) Some doors only have two and some doors have three. If you have the middle one, simply unbolt it so you do not have to cut it off later.
We are going to place construction shims at the top of the door (Photo 4) so that when we inflate airbags at the bottom of the door, it does not push the door up too high, making the door rub on the top. This is almost guaranteed to happen if you do not put the shims in place.
We also placed a little bit of shim in between the frame and the backside of the door as well. (Photo 5) We don’t want an absolute tight fit. Now that we have the door completely secured, you can see the airbag at the side and two airbags at the bottom holding the door in place. (Photo 6)
Josh is now going to use a cordless Milwaukee Tools angle grinder to cut the top pivot hinge (Photo 7). Make sure you use all your safety equipment when doing this.
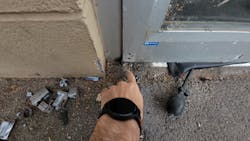
Once you have the pivot hinge split in half, you can use a hammer and a prybar or a screwdriver to split the hinge in half (Photo 8) and then it literally falls right off the door (Photo 9). Push the two bolts inside the door to be retrieved later. They will fall out the bottom.
In Photo 10, we are doing the same thing to the bottom hinge. Again, use the angle grinder to cut it and split it right down the middle. Use the hammer and bar to split the hinge directly down the middle and remove it from the door, pushing the two bolts inside. (Photo 11)
Once we open the door and there’s a small gap at the bottom, we will then be able to pull this out from the inside of the door. (Photo 12) We also smack that bottom cast aluminum pivot with a hammer and it will break right off after a couple blows.
In Photo 13, you can see the Ives hinge allows movement. It has those oval-shaped holes so that you can adjust the door after it’s been hung. You can adjust up and down, depending on which way it needs to go, even after the door has been installed. (Photo 14) To my knowledge, this is the only hinge with this feature. If the door or the frame or the building begins to settle or sag or move, there are adjustments that you can make later if necessary.
Also, we are putting self-tapping screws in. (Photo 15) These are very heavy-duty and will form a very strong bond. I was impressed with the self-tapping screws and the hardware that was sent out with this particular system.
Notice I have some of the holes circled in Sharpie (Photo 16). There are only eight throughbolts. Make sure that you understand where those eight go and space them out evenly so you do not drill through the door.
Photo 17 shows the door open and all those bolts that we had removed, falling out of the door. All the mounting bolts that mounted the pivot hinges on the door needed to come out of the bottom.
Photo 18 shows the throughbolts going through the door. I like to alternate these on either side so that you can’t take the door off from either direction. Photo 19 shows the inside of the door.
Now we’re going to put the cap (Photo 20) in place since all the self-tapping screws and through bolts have been fully installed. Photo 22 shows how easily it clicks into place (Photo 21). It clicks in the geared hinge side first. Then, use a piece of wood and a mallet to tap it into the other side.
Photo 22 shows the finished installation. The Ives continuous hinge is very futuristic and clean-looking. It blends in with the doorway nicely. The door operates flawlessly. This is a nice, secure option that comes with a lifetime warranty.
Wayne Winton is the owner of Tri-County Locksmith Services, located in Glenwood Springs, Colorado. For more information, check out Wayneslockshop.com and lockreference.com.
Wayne Winton
Wayne Winton is the owner of Tri-County Locksmith Services, located in Glenwood Springs, Colorado.


