With 400 million smartphones and more than 100 million mechanical small-format interchangeable cores (SFICs) in North America, the BEST Switch Core had to happen.
The Switch Core is an open-architecture wireless reader that works with many access control systems. The reader can slip into any SFIC housing in less than a minute. Mobile credentials provide immediate communication back to the head-end controller via the Cloud or Wi-Fi.
The product made its debut in 2020. We recently got our hands on it, and we found it to be quite impressive. We’ll walk through a basic installation.
Although there appear to be some similarities with other electronic-key products, the application, operation, integration into larger systems and market potential of the Switch Core are completely different.
Initial Switch Core distribution was through physical access control system (PACS) channels, such as Lenel, Genetec, LOCKT and others. Many PACS suppliers are integrating Switch Core into their product offerings. If your customer’s PACS doesn’t connect to Switch Core, BEST will provide application programming interface (API) modules.
The Switch Core now also is available directly to the lock trade through distributors. Although the Switch Core works best as part of your customer’s EAC system, LOCKT has developed an easy-to-use software package for smaller stand-alone applications.
The Product
The electronic core functions like any other reader in your customer’s PACS, except it’s inexpensive, doesn’t require wiring or power supplies, and can install in less than a minute. This is the SFIC component of dormakaba’s Switch Tech system.
As of this writing, the SFIC version doesn’t report latch and door position, nor is a weatherized version available.
Communication between the Switch Core and mobile credentials or fobs is by encrypted 2.4-gigahertz Bluetooth Low Energy (BLE). Transactional data is uploaded immediately to the PACS from the mobile credential or stored in the fob until the fob is synced with a mobile credential. A physical or virtual software bridge connects Switch Core data from the cloud or Wi-Fi directly into your customer’s PACS. Memory in the electronic core supports 30 holiday schedules, 50,000 users and a 3,200-event audit trail. Battery life is 1–2 years, and the read range can be set to short, medium or long distance. I found that the hands-free short-range setting is 2 feet.
The LEDs in the knob have four colors that confirm operations. Red indicates the capacitor is charging or that access is denied. Blue indicates the core is searching for an authorized credential. Green signals that access is granted. Purple lets you know the Control Mode is engaged, which allows the core to be installed or removed.
Beyond the cost of the core, your PACS software provider might charge minimal fees per credential to fund cloud management, automatic updates and reporting of your customer’s data. Your target markets will include small- or medium-size business, multitenant housing, difficult-to-reach locations and any place SFICs are installed. Colleges, universities and school buildings are prime opportunities. Hospitals, military and government agencies have tens of millions of SFIC opportunities as well.
AES-128 encryption protects communications and data. EAL 5+ Legic Secure Element chips protect encryption-key and data storage. Each app is registered to a specific phone, and two-factor authentication is available through mobile credentials.
How much abuse can the Switch Core take? Real-world experience with thousands of installations indicates that the product’s durability is a nonissue. The electronic intelligence is separated from the battery by a hardened shield. When access is granted, the tiny motor engages the clutch assembly, which allows the knob to operate the lock.
What’s in the Box?
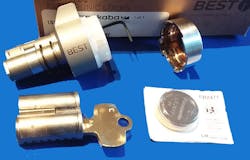
A small box contains the Switch Core, a 3-volt lithium CR2477 battery, a one-eighths-inch hex key (in the small hole that controls the locking lug) and the battery cap.
A brief manual that has clear illustrations comes with the package. You’ll want to download the Switch Tech User’s Guide, Core Install Instructions and Fob Operating Instructions from the dormakaba Switch Tech Knowledge Base. Pages 86–97 of the User’s Guide show how to set up the app and operate the Switch Core. After a couple of practice runs, the total installation and set up of the core took less than a minute.
With your first Switch Core order, you’ll want to add the magnetic battery-removal tool for your maintenance kit. You also will want a registration token number for each mobile credential or fob you plan to use. These will be your electronic keys, which can be ordered in batches for registration as necessary.
Installation
As intimated, installation is simple. The Switch Core is shipped with the locking lug (control sleeve) retracted and the one-eighths-inch hex key inserted in the small hole top dead center to the core.
When the operating knob is at the 10 o’clock position, you can push the hex key into a spring-loaded slot. Gently depress the spring halfway and rotate the hex key 12 degrees to the left (counterclockwise) to retract the locking lug (or clockwise to extend the lug). If the hex key bottoms out when you depress the spring, it’s too far in. Depress the spring about halfway, and the locking lug easily rotates when the app is in the Factory Reset or Control Mode Engaged condition.
Install the Switch Core with the lock’s existing throw member. Rotate the hex key gently to the right (clockwise), and you’ll hear a click as the locking lug snaps into place. Pull the core firmly to ensure the locking lug is engaged. After the core has been configured, the Control Mode times out in 15 minutes to prevent unauthorized removal. (Control Mode can be disengaged on the app.)
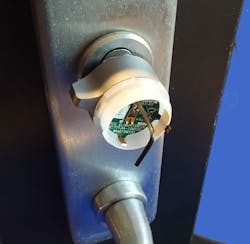
The stainless steel battery cover is held firmly in place by a concealed ferrous metal locking spring. When the magnetic Battery Cover Removal Tool is applied, the internal locking spring is expanded, which allows for the battery cover to be removed. I found that installing the battery cover was far easier when the magnetic tool holds the battery and cover.
Ensure that the battery cover is snapped firmly in place. Otherwise, the internal locking spring can bind and prevent removal. Press the cover firmly on and then rock the tool back and forth a bit. The tool should come right off. It’s actually a rather good design.
Be careful to not bend the electrical contact at the 4 o’clock position (opposite the operating lever) during installation. Because the battery is installed, the core will flash red while the capacitor charges. Charging could take up to 30 seconds. When the Switch Core flashes blue, it’s ready to be programmed.
The App
Download the Switch Mobile Access app to your smartphone from the Google Play or Apple App stores. After you open the app, you’ll be able to register that specific phone. Your registration verifies that the BLE connection is from the actual phone and not a relay hack attempt. After your phone is registered, you’ll receive a text that includes a verification code that enrolls your phone. (See pages 86–96 of the Switch Tech User’s Guide.)
Tap the Key icon on the bottom left of the app screen and then the + button on the top right to add a 16-digit alphanumeric Registration Token, which is your electronic key (Page 87 of the User’s Guide). You now are ready to program the Switch Core.
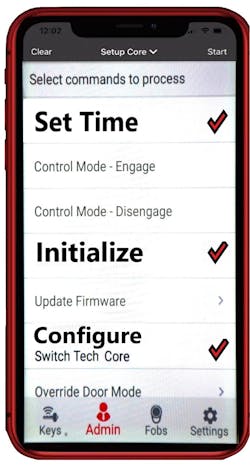
To program the core, you’ll have to have administrator (installer) rights for your customer’s system. Tap the Admin icon on the bottom. You then will be able to set up a core, reader or fob. Select Set Time, Initialize and Configure. A pop-up screen provides a list of one or more cores that you can configure. Select the one you want to configure for this credential and select OK. Tap Start at the top right and then tap the core with your fingers to “wake it up.”
The screen will confirm that you are connected, the time is set and the core is initialized, configured and ready to operate. Tap Done and then clear the screen. The Switch Core is ready to operate.
Tap the Key icon on the lower left and then tap the large Activate button in the center of your phone screen. Bluetooth will begin to search for a nearby Switch Core as the app flashes blue. Tap the battery cap on the Switch Core with your fingers to “wake it up,” and it will show a flashing blue LED. After a few seconds, the LED on the Switch Core will begin to flash green, and the app also will switch to green and begin a 6-second countdown as the core now is unlocked. At this point, the knob is engaged and acts the same way that a key would.
If you want to move a Switch Core to a different location, tap the Admin icon and select Control Mode Engage. Next, tap the Start button at the top right and then wake up the core. The screen will ask you to key in your Administrator PIN. The Switch Core then will flash a purple color to indicate that it’s in Control Mode.
Use the magnetic tool to remove the battery and cover. You then can use the one-eighths-inch hex key to rotate the locking lug to the left and remove the core. After 15 minutes, Control Mode times out. You also can select Control Mode Disengage to lock out the hex key immediately. Placing the core in Factory Mode resets all data.
The Switch Core is the SFIC component of dormakaba’s mobile credential-operated products. The electronic core plugs into the huge North American installed base of SFIC mechanical cores. Essentially, it allows you to quickly integrate a few or hundreds of doors into a site’s existing or new EAC system.
We found the Switch Core to be reliable, robust and easy to install. Your customers who have SFIC systems (or mortise cylinders) likely will be good prospects for this product. Typical sales tend to be dozens, hundreds and some even considerably more.
Cameron Sharpe, CPP, worked 30 years in the commercial lock and PACS industry. [email protected]
Documentation and Installation Videos
A full range of downloadable instructions are available from the dormakaba Switch Tech knowledge base, found at https://dhwsupport.dormakaba.com/hc/en-us/articles/360036366673-Switch-Tech.
Download the User’s Guide, Core Install Instructions and Fob Operating Instructions (if necessary). Pages 86–87 of the User’s Guide show how to set up your phone and the Registration Token (key). Pages 94–96 explain the brief details of configuring the Switch Core after it’s installed.
In addition, three helpful and brief videos are found on YouTube. These are:
1. Switch Tech End User – Claiming A Credential with a Phone: https://www.youtube.com/watch?v=U6jByPeRyKo
2. Switch Tech End User – Programming A Switch Core: https://www.youtube.com/watch?v=kzqVWS-K6B0
3. Switch Tech End User – Programming A Switch Fob: https://www.youtube.com/watch?v=kzqVWS-K6B0
It’ll take a couple hours to read everything and watch the videos.
Cameron Sharpe
Cameron Sharpe, CPP, worked 30 years in the commercial lock and electronic access industry. Contact him at [email protected].


