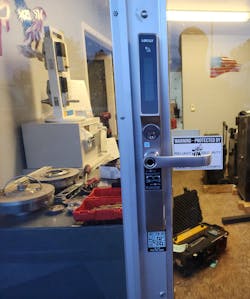
Today John Nolan and I are getting ready to install the Lockly Guard narrow frame aluminum glass strorefront standalone lock.
Watch the installation at https://www.youtube.com/watch?v=Ml7xSabnOYw
We’re going to start out by using the Major Manufacturing HIT 32 AL-3 jig. That is going to give us our four top and bottom mounting holes. There are six holes total, shown in Photo 1. The top additional hole is going to be for the wire that feeds through, and the bottom additional hole is going to be battery access.
First, we will remove the Steel Hawk that is currently located in the lock position (Photo 2) and install an Adams Rite 4900 dead latch. After we do that, we can actually install the lock directly onto the door.
In Photo 3, you can see those three holes. The top two are the mounting holes and the bottom one (Photo 4) is for the wire.
Again, we've got the same pattern upside down: the bottom two holes are going to be for the mounting holes and the third one is going to be for Allen head battery access from the inside.
The main difference between the Alarm Lock prep and this one for Lockly is that you'll have to make those holes much larger than what Alarm Lock requires for their installation.
In Photo 5, the data cable and communication cables are feeding through the door. Make sure that there are no sharp objects or anything obstructing the wiring.
Photo 6 shows the drive cam. They send a left and right drive cam and you can test this with the lock in your hand if you would like or you can test it on the door directly.
Now we have that deadlatch installed on the door ready to go (Photo 7) and we've got the drive cam installed as well. (Photo 8)
This drive cam will install and be set with the set screw from the deadlatch itself to hold it in place. Those two studs will also align with the lock itself.
Photo 9 shows the view from the inside. You'll notice that we have the right-hand cam mounted on this particular application.
Now that the lock is physically mounted on the door (Photo 10), we can begin adding the screws and mounting screws from the inside. Photo 11 shows the internal mounting plate. One of the screws mounting screws has been installed and we are getting ready to install the other one.
We're double- and triple-checking and making sure that the wire is free and clear of obstructions or sharp objects.
In photos 12 and 13, we're demonstrating that the key override is actually working and the handle pulls down. I like to test every time I tighten a screw. In photo zz, you can see that the latch is retracting on the Adams Rite deadlatch. Every single time I tighten a screw, I retest that deadlatch function to make sure that everything is working properly.
Now we can begin putting the studs on for the paddle on the inside and then installing the paddle. We will use this exit paddle (Photo 14) to exit the building. You could also use an exit device if you have one that is compatible.
Photo 15 shows the cover plate that will cover up the screws and make the job look nice and clean and finished. Photo 16 is a close-up view of the top portion of that same cover plate.
Next, a Bluetooth dongle (Photo 17) gets attached to the data communication cable. It threads in and then you stuff the cable back into the hole into the door until it's hidden as much as possible. You simply peel back the protective layer and reveal the adhesive on this Bluetooth dongle and stick it into its location under this cover plate (Photo 18). This gives it a nice, clean look without adding any more screws.
If you have some extra holes (this is a door where we've done quite a few retrofits), these aluminum stickers from Professional Business Products shown in Photo 19 are not only great for covering up holes, but they're also amazing for advertising your business for future calls.
Now that the Lockly installation is complete, we will test it with the code, key and key and even an RFID Card (Photo 20). This installation was ultra simple and the lock is user-friendly. For more information, visit www.locklypro.com.
Wayne Winton is the owner of Tri-County Locksmith Services, located in Glenwood Springs, Colorado. For more information, check out Wayne’slockshop.com and lockreference.com.
Wayne Winton
Wayne Winton is the owner of Tri-County Locksmith Services, located in Glenwood Springs, Colorado.


