Electrifying A Schlage Mortise Lock With the SDC Field Electrification Kit
The economy is down and companies are struggling to get by, so saving your customer a significant amount of money will just about guarantee you the job. Having the capability to electrify your customer’s Schlage L9080 Storeroom Function mortise lock to either Fail Safe or Fail Secure at 12 or 24VDC eliminates the need to install a new electrified mortise lock or send out the customer’s' lock for electrification.
Security Door Controls (SDC) has introduced the Field Electrification Kit for Schlage L9080 mortise locks. This kit, part number SK-L90 provides locksmiths with the ability to electrify any L9080 Storeroom function mortise lock for Fail Safe or Fail Secure operation. The mechanical Storeroom Lock, ANSI 07, function retracts the latchbolt from the exterior using a key or the lever/knob from the interior. The exterior lever/knob is always rigid. When the door closes, the auxiliary latch deadlocks the latchbolt. The interior lever/knob is always free for immediate egress.
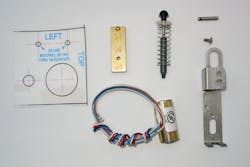
The SDC SK-L90 Kit contains the solenoid, Cradle, Slide Arm, pin. Screw and template for the installation and electrification. The UL/CUL Classified dual coil solenoid operates using 12 or 24VDC. The voltage range for 12 or 24 VDC is + 10%. The current draw @12VDC is 600 milliamps and @24VDC is .300 milliamps.
For this article, I was provided a Schlage L9080 and the Field Electrification SK-L90 Kit. To install the kit, two 5/32" holes are drilled through the back of the lock case near the lock cylinder opening. A clear template is included to locate the positions of the holes. Begin by using a punch to locate the center of the hole. Drill a pilot hole, approximately 1/8" diameter. Then drill the 5/32" holes.
Security Door Controls has an installation video that can be viewed on computer, droid or Apple phones. The smart phone reference installation video is SDC APP. For a computer, go to www.sdcsecurity.com.
Carefully remove the four screws securing the cover onto the lock case. Note: Use a digital camera to photograph the components. This way if the components should dislodge, you can always look at the picture to make repairs.
The Schlage mortise lock provided had a Changing Hand label place onto the cover. The label covered the cylinder Plate & Screw, Auxiliary Latchbolt and the Standoff Post. To simplify the installing the cover, I used a small knife to remove the portions of the label that covered the holes.
Remove the Transfer Lever, the Auxiliary Stop and Spring, and the Locking Catch. I discarded the Catch Pin.
The next step was to clean the inside of the case of any burrs from drilling the two holes and excess grease.
I then filed the opening in the Locking Catch to permit a smooth operation when the solenoid disengages the retractor hub.
The next step was to install the solenoid cradle with the wider lip along the bottom. Only one screw is used to secure the cradle in place.
Place the Slide Arm onto the Locking Catch in the case and attach the Slide Arm onto the solenoid plunger. Insert the pin into the into the Fail Secure or Fail Safe opening in the Locking Catch. The Fail Secure is the hole closest to the solenoid.
Slide the cover onto the lock case, being careful to position the latchbolt, run the wiring out of the opening at the top rear corner of the case and place the tabs in the cutouts in the cover. A probe or dental tool can help to position the tabs. Once the cover is seated, install the four mounting screws.
Four wires extend from the solenoid. If the installation is 24VDC, attach the black and blue wires together. The red wire is positive (+) and the white wire is negative (-). If the installation is 12VDC, attach the red and black wires and the blue and white wires. The red and black wires combined are the positive (+). The blue and white wires combined are the negative (-).
Test the operation of the solenoid to be certain the lock mechanism releases in either Fail Secure or Fail Safe mode.
SDC offers an optional REX Kit, model S7800REX. The REX switch rating is 5 Amps. A "Request to EXit" (REX) switch signals the opening of the door to an alarm or security system to activate a non-disruptive means of immediate egress or to monitor the opening of the door. The REX is positioned adjacent to the retractor crank, and is actuated when rotational movement of the inside lever/knob rotates the retractor hub.
The Security Door Controls Field Electrification Kit eliminates time delays for retrofit and out-of-pocket expenses for transportation. Having an SK-L90 kit allows you to electrify your customer's Schlage L9080 mortise lock.
For more information, contact your local locksmith distributor or SDC, 801 Avenida Acaso, Camarillo, Calif.,93012. Telephone: 800-413-8783. Web Site www.sdcsecurity.com.
- Tools Needed: Drill motor, 1/8" and 5/32" drill bits, center punch, hammer, Phillips head screwdriver, probe
- Retrofit Time: Approximately 20-30 minutes
- Warranty: Five years


