At one time I visited the Boda lock factory in Finland. A very large circular rotating table contained multiple stations. Empty stamped steel mortise lock cases were automatically loaded at the first station. As the table rotated, the lock cases moved from station to station as steel internal parts were inserted. Other stations wound and inserted springs as needed. With a steady kachunck-kachunk sound, finished mortise lock cases were automatically moved off the rotating table in a steady stream.
Memories of that automated machinery came back to me as I looked recently at a 100-year-old Corbin unit lock. Patent dates on the cover dated from 1905. Almost every operating part in the lock was made of cast brass. Each part intertwined with other parts in the lock with Swiss watch accuracy. There was no sign here of automated assembly. This lock had to be meticulously hand assembled. Instead of a bland stamped steel case, the lock featured a solid cast brass chassis and delicate ornamental designs on the knob and escutcheon plates.
The Corbin unit lock arrived on my desk in an unusual way. A Chicago locksmith had a customer who wanted the Corbin lock repaired back into working order. The locksmith contacted Locksmith Ledger and sent me a picture of the lock, inquiring whether parts were still available. This specific lock design has not been made in 70 years. But the challenge of bringing the lock back to life was enough to make me volunteer to do the job and the locksmith agreed.
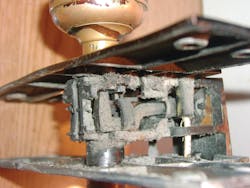
Although no parts were missing, the lock unit was in sad shape (Photo 1). Fifty years of dirt covered all of the parts. Some time in the past, the lock was 'converted' to a deadbolt-only function when someone forced a sheet metal screw between the pullman latch and the chassis to prevent the latch from extending.
The first order of business was to remove all possible parts out of the chassis for cleaning (Photo 2). The bolt and pullman latch were retained by solid pins which were pressed into undersized holes for retaining. The 'U' shaped yoke had to be twisted and turned into just the right position for removal. Some engineer must have taken a long time to figure out just what size and shape the pieces had to be so they could be meshed together.
Not shown are four steel hub parts which slide onto the square driver shaft. The one remaining part in the chassis is the thumb turn actuator. It appears that the chassis was originally spread apart slightly to allow the actuator to be installed. It was easier to clean the part in place instead of exerting any undue force on the old chassis.
Before final assembly, the lock cylinder was removed from the outer knob and two keys were fit. The lock cylinder had an extra-large jumbo cylinder with two shearlines. This lock was being used in a residential setting, so no masterkeys were needed. Change keys were fit to the standard core only. The keyway was the Corbin X1-99-5 or EZ CO1 keyway. A C13 code card can be used to originate the keys.
The completed assembly shows the lock parts in the same condition as the day it was made (Photo 3). If you tackle a job such as this, take some digital photos during disassembly. This will save some anxious moments during re-assembly.
The hardest part of this job was to get the timing correct on the hub parts. I would have liked to watch the assemblers at the factory when they were doing that job. The easiest way I found was to use long tweezers and fit each of the four hub parts on the square shaft one at a time. This took three 'remove and re-assemble' sessions and a bit of frustration before the timing was correct.
A finished product is shown in Photo 4. One quarter turn on a collar in front of the inside knob locks or unlocks the outside knob. A full turn on the key will extend or retract the bolt unit. An additional quarter turn of the key retracts the latch if the outer knob is in a rigid, locked position. Even with the hard life this lock has endured over the years, very little straightening or repairing was needed. The biggest chore was in cleaning each part back to its original luster. Photo 5 shows the case cover plate with patent dates. They don't make them like they used to.
About the Author

