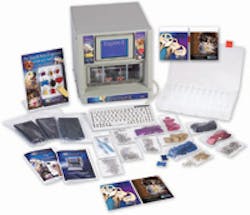
Looking to broaden your appeal to your customer base and increase your impulse sales? Take a look at the new Ilco Engrave-It™ business and consumer products computerized engraving machine. The Engrave-It can cut numbers, letters, and designs into metal surfaces such as keys, mortise/rim lock cylinders, dog tags, luggage tags, military tags, and identification plates. The Ilco Engrave-It is relatively quiet operation, just the sounds of the stepper motors spinning and the stylus cutting away at the metal.
The Ilco Engrave-It is a computerized engraving machine with a built-in display that indicates the steps to be taken and shows the options. The built-in display is designed to tilt up or down in order to adjust for the operator who is standing or sitting down when operating the machine. A small computer keyboard is used to enter the necessary information in order to engrave an item.
To engrave, the holder is determined, the item is selected, and the font or clip art is chosen. If the font is chosen, then the information being engraved is entered and indicated on the display. Depending upon the size of the engraveable area and the number of lines of type or the clip art, the Engrave-It resizes the font or clip art to fill the area.
IMPORTANT: The Engrave-It is designed with the option of engraving the item a second time for a much deeper cut.
The Engrave-It cuts into the surface of the item using a diamond tip stylus. The stylus has the ability to move up/down, left/right, and forward/back to create the image or character. The engraving table moves forward and back in order to install/remove the holder and load/unload the item being engraved. The holders are machined metal or rubberized plates, each having cutouts of the item's shapes. Each holder is designed for specific items. The tags, keys, lock cylinders and plates are pressed into their respective cutouts in the proper holder to be engraved.
The sample Engrave-It machine came with three holders. One holder secures keys for engraving. Another holder secures tags, and the last holder is used to engrave identification tags and plates.
Once the object being engraved is in position, and the engraving entered into the machine, the stylus scratches away at the metal surface creating the numbers, letters, or design. The machine will engrave into copper, brass, aluminum and stainless steel. Depending upon the size of the item, up to six lines of type can be engraved into the surface. The Engrave-It is designed to automatically increase or decrease the size of the characters or designs to be compatible with the engraveable area.
Depending upon how many letters are used on each line and on the number of lines, the size of the font can vary dramatically.
Note: The Engrave-It can engrave on uneven surface contours by compensating for the variations.
The Engrave-It is a compact machine weighing only 31 pounds. It is self-contained at 15 inches tall by 14 inches wide by 18 inches deep plus keyboard. The Engrave-It is operated by a compact keyboard and LCD display from which all commands and engravings are entered.
The machine is relatively quiet; the sound of stepper motors turning and the short cutting sounds are audible as the machine is engraving.
The Engrave-It offers a choice of eight fonts. The eight fonts are identified by the number of lines and the shape of the characters. The first font is 1L Block, a single line block style font. There are two 2L fonts, Century and Block. Then there are the Script and Contemporary styles. The final three fonts are the 3L Roman, the 5L Optima, and the 3L Helvetica. Some of the Engrave-It fonts can create international characters by pressing a combination of the letter/number and the operating key(s).
The clip art choices are made up of 63 preset images, and the option of a company logo. The images include animals, sports, flags, etc. For logo information, contact Kaba-Ilco.
The procedure for engraving the item is displayed on the screen. The keyboard is used to instruct the machine what and how to engrave.
To engrave a key blank:
NOTE: At any time, pressing escape key returns to the previous screen.
Step 1. With the keyboard plugged in and the power on, press the F4 key to install the holder. The F4 key slides the engraving table out of the machine so the holder can be installed.
The holders are designed to be installed in one direction only and have three openings along the front and rear sides that accommodate the six pins extending from the engraving table. If the key engrave holder is installed, the key retainers need to be pressed to have the tabs beneath the holder enter into the openings in the table.
Step 2. Tell the machine which holder has been installed. For this article, we will engrave a neuter bow key blank. Use the up or down arrow to choose the correct holder. Once the correct holder is indicated on the display, press the enter key. This tells the machine that the key holder is installed.
Step 3. The main screen appears. Press any key to continue.
Step 4. The Item selection screen appears. Use the up or down arrow to choose the key to be engraved. For this article, we will use a neuter bow key blank.
Step 5. Once the key bow with the proper blade appears, press Enter.
Step 6. Choose the font or clip art from the next screen. For this article, we will use the 2L Block font to engrave FRONT DOOR into the key.
Step 7. Once the font number has been pressed, the screen that appears will have the shape of the key bow onto which the characters are typed.
Step 8. Type the word "FRONT DOOR" using capital letters. In the top left corner, if the caps key has been pressed, the word CAPS appears, indicating all of the letters typed will appear as capital. If caps lock is not on, the lower case letters will appear as small capital letters unless the shift key is pressed when typing the letters.
On the right side of the display, press ESC to change the font, F2 to engrave the item and F8 to clear the text.
We engraved two key blanks, one key blank with "FRONT DOOR" on a single line. The second key blank had "FRONT" on one line and "DOOR" on a second line.
Step 9. Press F2 to engrave. The door will open and the engraving table will slide out in order to mount the key blank.
Step 10. Mount the neuter bow key blank and press the Enter key.
Step 11. The next screen is the check text. This screen has the word spelled out and the chosen font. If this is correct, press Enter. If not, press ESC.
Important: As an option to pressing the Enter key, pressing the number 2 key will automatically engrave the item twice, making the final engraving deeper.
The next screen indicates the machine is engraving and to wait. The engraving takes about one minute, a little less if there are not many characters or complexities to engrave. The time is doubled if the item is being engraved twice.
The final screen is the congratulations! Screen. From this screen, you have the choice to F1 engrave other side, F2 engrave new item, 1 Repeat previous item, F8 edit text, ESC return to start screen.
Note: If the Engrave-It is idle for a period of time, the screen will darken to save energy and extend the life of the display.
To help promote sales, Engrave-It comes with point-of-purchase display items. These include shelf talkers, tag display easel, and window decals. The shelf talkers have an adhesive top enabling the display board to be mounted beneath a shelf. The standing tag display easel can hold up to nine tags or keys. The self-sticking, vinyl window decals can be placed on a storefront window or other smooth surface to increase customer interest.
For more information, contact your local locksmith wholesaler or Ilco, P.O. Box 2627, Rocky Mount, NC 27802. Telephone: 800-404-4526. Fax: 252-446-4702. Web Site: www.kaba-ilco.com.


