Keys are sold in every country in the world. Key blanks are manufactured to the specifications of the producer or lock manufacturer. Key blanks are made of various materials including aluminum, brass, iron, nickel silver and steel.
Steel (ferrous metal) keys are common worldwide and are becoming more common in North America as key blank applications are not limited by country borders. For example, on the Silca “107” Key Blank Catalog technical information page’s list of the standard production materials, the first is steel. The language flags listed in the catalog in order are United Kingdom, Italy, Germany, France, Spain and Portugal.
For the North American market, locksmiths have been cutting softer metal key blanks, mainly brass and some aluminum. The only steel key blanks I can remember from many years ago are automotive. Most of them were gold plated presentation key blanks. Some were special orders for European model vehicles and only available in steel.
North American cylindrical key machines - originating and duplicating - are designed for brass key blanks. Most of these key machines operate at about 800-1000 revolutions per minute (rpm) for high speed steel cutters.
Steel content key blanks can dull or break the teeth of a key machine’s rotary cutter operating at about 900 rpm. A key machine that cuts key blanks containing ferrous metal should operate between 1600 and 2000 (about twice the rpm) equipped with a carbide cutter.
There is an additional problem. With the increase in the price of brass and the regulations against lead, some key blank manufacturers are adding or increasing the amount of ferrous metal in their key blanks. There appears to be an increase in the number of brass key blanks that have a greater ferrous metal content.
Locksmiths have two options. First, they can purchase a key machine that is designed for steel key blanks.
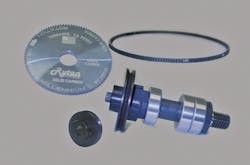
Second, locksmiths who own a Rytan RY100 or RY200 can install the Rytan RY103 Optional Carbide Cutter and Pulley Kit. Installation of the kit increases the speed of an RY100 or RY200 to approximately 1800 RPM. The RY103 has 100 teeth sintered carbide cutter that is 3.15” in diameter. The carbide cutter included angle 80 degrees, coming to a point that provides a clean duplication. The carbide cutter is the same size as the high speed cutter that comes with the machines.
The carbide cutter is offset on the right at .180” and a narrow offset on the left of .020”. The cutters’ teeth are longer on the right side. Key should be duplicated from the head to the tip with the cleanup from the tip to the head.
Sintered carbide is approximately three times stiffer and much more dense than steel. Carbide cutters are very abrasion resistant and are able to withstand higher temperatures than standard high speed steel cutters. Carbide cutters remain sharp for many times longer than high speed steel cutters. An additional benefit of a carbide cutter is a smoother cut when cutting brass and aluminum key blanks at a faster rpm.
The downside of a carbide cutter is it is more expensive and more brittle than a high speed steel cutter.
A carbide cutter can be a great investment when properly maintained. It can remain sharp for many years of cutting keys by following two simple rules:
- Always make sure the key blank is properly secured in the vise jaw.
- Never force the cutter to cut the key.
In addition, it cannot hurt to spray a bit of lubricant onto the key blank blade prior to cutting.
Many locksmiths own multiple key originating and duplicating machines in addition to punch key machines. Knowing if there is ferrous metal content in a key blank gives them the option to choose a specific key machine.
To protect your rotary cutters investment, attach a magnet onto a flat spot pointing up on each key machine. This way, there is no additional effort to slide the key blank across the magnet. If the magnet draws the key blank, there is ferrous metal.
The RY103 kit comes with a solid carbide cutting wheel, cutter shaft and pulley, motor pulley and belt. The new cutter shaft with built-in pulley has a smaller diameter. The motor pulley has a larger diameter. The new cutter shaft and pulley and the motor pulley change the geometry, doubling the cutter speed.
RY100 Conversion
For this article, we converted an RY100. The tools required are a 1” closed end wrench, a 1/8”, 3/16” and 5/32” hex wrenches.
The first step is to install two key blanks stacked in the cutter vise. Use the top shoulder key gauge, making sure they both properly align with each other. Turn on the machine and cut a V-notch in the middle of the blanks. They will be the spacing guides to adjust the new cutter shaft.
The next step is to unplug the key machine.
Remove the brush, brush guard and clear cutter guard if equipped.
Remove the cutter using the 1” closed end wrench by depressing the cutter shaft lock. Turn the nut counterclockwise to loosen.
Remove the belt guard and the belt.
As an option, use a digital camera to photograph the cutter shaft area. When you install the new cutter shaft, try to position it as close as possible to the old cutter shaft. This will simplify the adjustments required.
Loosen the two 5/32” hex head screws in order to slide out the cutter shaft.
Once the old cutter shaft assembly has been removed, install the new cutter shaft assembly in the same position.
Remove the motor pulley using a 1/8” hex wrench and install the new motor pulley.
Install the new belt.
Install the carbide cutter. Tighten the nut in the clockwise direction.
Place the upper key into the cutter vise jaw.
Place the lower key into the pattern vise jaw.
Use the top should key gauge to position the keys.
Release the carriage positioning it having the stylus (copy dog) in the pattern jaw key v-notch.
Observe the cutter position in regards to the V-notch in the key.
Adjust the cutter shaft assembly so the cutter is centered within the V-notch.
Rotate the cutter backwards. If the cutter does not contact the blade on either side, the spindle is in adjustment.
If not, loosen the two hex head screws and slide the cutter shaft to center the carbide cutter within the notch.
Tighten the 5/32” hex screws. Do not over tighten.
Install the belt and the belt guard.
Install the brush guard, brush and cutter guard if equipped.
After the installation has been completed, adjust the depth of cut.
The carbide cutter cuts key blanks with ferrous metal content and provides a smoother finish. Most key blanks can be duplicated a little faster.
Carbide cutters can be re-sharpened multiple times.
The time to install the kit is approximately 30 minutes
The RY103 can also be installed onto the RY256 and RY456 key machines. Contact the factory prior to installing.
The RY103 is available without the carbide cutter.
For more information, contact your local locksmith distributor or Rytan Inc., 455 Maple Street, Torrance, CA 90503. Telephone: 800-447-9826. Web Site: www.rytan.com.


