When it comes to building a new service vehicle, I look for unique vehicles that meet my demands. Those are to provide long-term reliability, efficient organization of tools and four-wheel-drive capability for the rugged alpine environment in which I operate.
Being located in the middle of the Rocky Mountains in central Colorado, close to Aspen, the steep terrain and average of 179 inches (almost 15 feet) of snow per year requires a special type of vehicle to service customers in this area. Figure in my specialty service that includes safe delivery, and you can see that your average service van simply won’t cut it.
I have built everything from vans to Subarus and even completed an ambulance conversion. What I found is that a heavy-duty 1-ton diesel four-wheel-drive truck that can tow a trailer is about the only thing that will put up with the daily abuse my profession can dole out. My latest build became my ultimate truck build.
Choosing the Vehicle
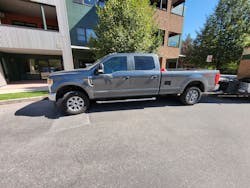
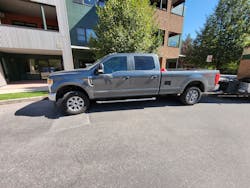
When it came to selecting a new base vehicle for the build, I could think of nothing better than a 2020 Ford F-350 that has a 6.7-liter Powerstroke engine and 10-speed transmission. (Image 1) I bought it as my personal vehicle but fell in love with the all the nice modern features, such as remote start from my phone app for a nice toasty start to my day. After I replaced the family vehicle — my wife was happy to get a new car, too — I set out to make it a killer “ghost” ride that has no lettering or advertising. I had to decide the best way to set the vehicle up to get the job done.
I began by looking for a topper, and my research led me to some cool options — everything from large dome stand-up slide-in shells to the normal camper and the utility-style metal toppers. Price being a factor, I searched Facebook classifieds and found a nice ARE Topper that had two doors that allowed access to the tools from the standing position outside the vehicle. (Image 2)
I like this approach, because I hate crawling into a van and bodysurfing my way to whatever it is I’m searching for. Been there, done that. No, thank you! With new toppers costing upward of $3,500, I practically stole this thing for a cool $800. It was in great condition, although the utility white color was a no-go.
The other issue was the F-350’s rear door system. I love the backup camera on the tailgate and the fact that the tailgate locks via the remote and vehicle. So, I had to figure out how to paint the color to match and redesign the doors to keep my beloved tailgate.
I negotiated a trade for the paint job from a local auto body shop owner who was looking for a drone. (Did I mention I love Facebook marketplace? You can find just about anything there!) So now, I’m getting a slick color-match paint job that normally would cost a few thousand dollars for a drone I no longer used. Paint problem solved. (Image 3)
Now that the topper was looking nice with a fresh coat of color-matching paint, I could redesign the rear door system. I had to keep my tailgate but have a sealed enclosure that can’t be pried open easily. This was another reason I didn’t like the factory double-door system. It felt like a screwdriver or pry bar would have it jimmied open in no time. If I could remount the door to the top and have it overlap the tailgate, it would solve all the issues I didn’t like. So that’s what I did. (Images 4 and 5)
Phenomenal! The door was functional, and I got to keep my tailgate with the locking security features and backup camera all while using all the parts of the topper.
Getting Organized
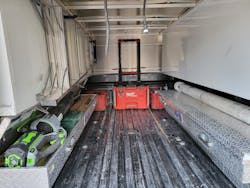
Now, it was time to figure out how to mount all my tools in this beast. But the cheap aluminum toolboxes I had had to go. (Image 6)
I’m heavily invested in the Milwaukee cordless tool system and recently started to buy the company’s PACKOUT toolboxes. These things are, by far, the most durable and convenient versatile system I’ve seen in the market. The lineup features tool bags, toolboxes, storage bins in many sizes and even backpacks that work with the PACKOUT system.
After saving thousands of dollars on the topper and paint job, I had ample wiggle room in my budget for a PACKOUT system. These storage containers are so versatile that they have base plates that can be bolted to a vehicle and then clicked into the base plate. (Image 7)
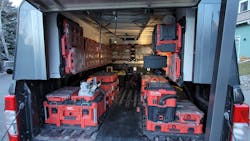
I added the exact number of containers I could fit in my truck bed and went to town installing and bolting them into place. I wanted to maximize every square inch of the topper and bed design, so I mounted containers on the sides of the topper and directly to the bed of the truck.
It took a few tries to get everything just right, but it eventually all came together. The most awkward item to find a home for was the ladder. It simply didn’t fit anywhere. I also did NOT want to add an ugly ladder rack on top. Yes, I know this would have been an easy solution to the problem, but I wanted this truck to have a real one-of-a-kind look to it and not look like just another “utility work truck.”
I wanted to make sure this truck would last. Past builds had proven that self-tapping screws don’t get the job done long term or handle a good impact.
So, I used NutZerts, rive nuts, blind nuts or whatever you choose to call them. They’re basically forged nuts that have threads that crimp into the surface you’re trying to mount to, which allows threads to be added to a thin metal or aluminum surface for a far more secure hold. Instead of maybe one or two threads for a self-tapping screw to grab on to, the sheet metal provides the strength of a nut and bolt but doesn’t require access to both sides.
This is a must have, too, for a beastly build and locksmith work in general. Have a stripped-out door closer and door frame that look like Swiss cheese? NutZerts will solve your problem, and that door will stay put until the building is demolished! I used the Marson NutZerts setter kit from Fastenal that has aluminum 1/4-by-20 thread NutZerts. (Images 8 and 9)
belongs with ease and efficiency. (Images 10 and 11)
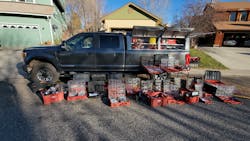
With the layout to my liking and all the base plates firmly secured to the topper and the bed, I began to install and mount the containers, toolboxes and storage bins. (Image 12)
I wasn’t joking when I said I was invested heavily invested in the Milwaukee tool storage system. Yes, all of the nearly 30 containers fit in this rig. Every box clicked into place and interlocked with the base plates and one another to form a sort of Lego-style click-in system. After it was installed, the system could be modified, moved, changed and swapped out easily with my other trucks. These bins hold everything neatly. My locks, tools, jigs, safe tools, drill bits, scopes, tire chains, paint, key machines, duplicators, vacuum and every other thing you can think of have their own homes. (Image 13)
The Final Touches
It’s difficult to believe that everything was stored in this compact truck, and it doesn’t even look like a clunky work truck. The only option I had for the ladder was to mount it to the center of the roof inside the topper. Yes, I have to crawl in the back, but it’s no smaller or different than having to climb inside any regular low-top van.
It would have been nice to stand, but not being able to was a sacrifice I was willing to make for all the advantages that this system delivered. A stand-up high topper also would have been close to $10k, and that was not in the budget for this build. Plus, a big high-top utility box would make this thing look like a much more dedicated work vehicle, and I was going for total stealth-mode here. This could just as easily be a daily driver, and no one would know the difference. Ghost rides don’t draw as much attention to yourself and the tools inside your vehicle from potential thieves scoping out their next score. Utility trucks particularly are targeted as treasure boxes that have “the good stuff.”
Now, you’re probably asking yourself, “If this is a locksmith vehicle, where are the key machines? Where do you rekey locks? The seats?” Yes. I have a unique solution for that, too!
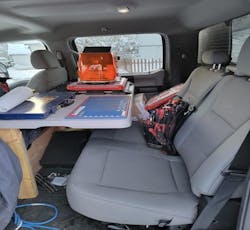
I have become a bit of a fair-weather locksmith and don’t like to bake in the back of a van on a hot day or freeze when it’s minus-19 degrees out and your fingers are numb. I decided to use the back seats that are installed. I built a workbench and fashioned a pin kit and pinning tray, attached by hook-and-loop tape, so they can be moved inside a building for those big jobs, but stay put while I drive the pothole-marked roads of the Western Slope. Now I have all the comforts of a climate-controlled environment with heat and air conditioning while also boasting a comfortable seat that I could use all day, if necessary.
I also mounted a Triton Key machine to the table using — you guessed it — the PACKOUT system. The truck’s stock power inverter runs all the key machines and duplicators I have. This also can be moved and mounted in an office or another vehicle in seconds. All jaws and accessories are stored in the PACKOUT system, so the entire system stays together at all times. Firm solid mounting and a quick push-to-release button made this the most versatile option I could imagine. (Images 14 and 15)
Now I have all the tools I want in tough, weatherproof containers that click together, which makes everything organized and easy to access. I can use the pinning station while jamming out to my favorite tunes and work incognito in a climate-controlled workspace that has enough horsepower (495) and torque (1,050 foot-pounds) to smoke a Mustang while towing a trailer up any hill or mountain I come across. (Image 16)
This is truly a one-of-a-kind ride that I will remember for a long time. Hopefully, I’ll get five years and around 300,000 miles out of it before it’s worn out, and then I’ll get to build another unique creation that will, in time, measure up to this one.
Wayne Winton is the owner of Tri-County Locksmith Services, located in Glenwood Springs, Colorado. Scan the QR code to see the in-depth video footage of the build.
Wayne Winton
Wayne Winton is the owner of Tri-County Locksmith Services, located in Glenwood Springs, Colorado.
