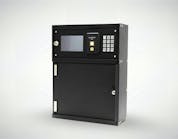
Programming tools are essential to automotive locksmiths, and the Xhorse Key Tool Max is one of the most underused tools that people have in their arsenal. This device is a powerful tool if you use it properly.
I use it extensively, and I still don’t use it to its full capacity. Nevertheless, here’s a primer on some of the commands and functions and how automotive locksmiths can use the Key Tool Max effectively. Keep this handy as a future reference.
Key Commands
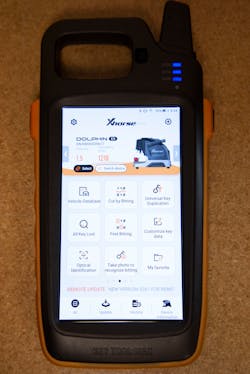
Dolphin Use: You can look up vehicles in the Key Tool Max’s Vehicle database. (Image 1) When you select the make and model you want, the tool will give you the option of selecting what key blank to cut. After you select the key blank, the tool will tell you how to load the blank and also what jaw to use on your Xhorse key machine. After that’s determined, you can select one of the four choices at the bottom.
Info: In here, you’ll find useful information, such as what key blank to use, the number of bittings, what clamp to use, whether the key is tip stop or shoulder stop and what Lishi tool to use, if necessary.
Find Bitting: This option works similarly to a fill program. The command will give you the missing cuts and key code if you input the majority of the cuts.
You start by going to Vehicle Database, where you select your vehicle and the corresponding blank. (Image 2) In this case, I used a Ford F-150. The tool shows you what clamp to use and whether the key is tip stop or shoulder stop. Next, you choose Decode key, where you’ll see the option box for Learn key via photo. Select that box and then select Continue. (Images 3 and 4)
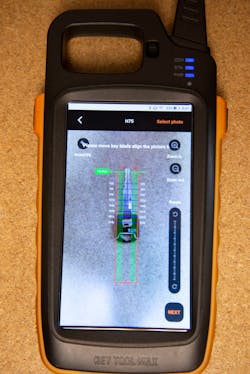
A screen will come up where you can take a picture of a key blade, keeping the tip of the key at the top of the outline. On the next screen, you’ll zoom in until the sides of the blade line up with the sides of the screen outline and drag the image to align the key cuts with horizontal lines on the outline. (You’ll have to do some adjusting here.) (Images 5 and 6)
When you’re satisfied with the alignment, you select Next. On this screen, you’ll adjust the depths of the cuts by moving the left and right arrows to move the dots in or out. After you have the correct depth, you select up or down arrows to move to the next space.
After you select all of your depths, you select Succeed to go to the next screen and it will show you a silhouette of the cut key. Now, all you have to do is select Cutting Key to cut your decoded key. (Image 7)
Cutting Key: This option allows you to cut the key either by the code you input or by the bitting you’ve come up with.
Half-cuts: You start by selecting your vehicle from the Vehicle Database. In this case, I used a 2007 Cadillac DTS. You then select the key blank that corresponds with the make and year. (You might have several options, so I chose B103). The Key Tool Max will show you which clamp or jaw to use and what position to place the key blank.
The Parameter micro adjustment button will show you the OEM depths. (You’ll see measurements for space and depth, but we’re focusing on the depth part of it.) (Image 8)
Now you’ll have to do a little math. The Key Tool Max uses the metric system, so depths for each cut are listed in micrometers rather than inches. If you use a key guide, remember to make the adjustment to metric.
In either case, you subtract the amount from one depth to the next to get the full depth. In this case, the depth for a 4 cut is 670 and a 3 is 605, so 670 – 605 = 65 for the full depth. Dividing that by half (and rounding up) is 33. For each position, you’ll see on either measurement a plus or minus button. You’ll want to change the depth distance to minus-33, because our number was the difference of 33.
Transponder Commands
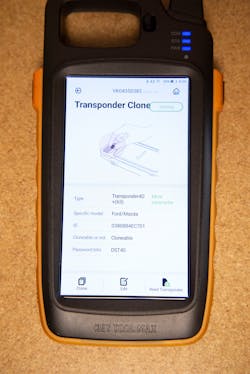
Transponder cloning: This is in the Key Tool Max menu. (Image 9) In this example, I’m using a Ford 4D63 chip. After selecting Transponder Clone, the tool will direct you to put the transponder into the reader to detect. (Image 10) Select Read transponder, and you can see the type, model, whether it’s cloneable, whether it’s locked and password bits. (Image 11) You then select Clone and then Start clone.
Generate Transponder: Here you can generate chips to different vehicles. You can search by chip model or by car model. The steps are otherwise similar to cloning.
Chip Renew: This is for Xhorse super chips that can be reused repeatedly. In the Key Tool Max menu, you select VVDI Super Chip, scroll to the bottom and hit Reset VVDI Super Chip. You also can go to Set type of super chip and again scroll to the bottom, for the Reset VVDi Super chip command. You also can set these chips as certain types.
Set type of VVDI super chip: This is found under Special Functions. (Image 13) Here you can set the super chips as specific types, such as 7936, 7937 and 4C. Also under this menu, you’ll find Reset VVDI super chip again. (Image 14)
Vehicle remote generation: Here’s where you generate Xhorse remotes or the Xhorse smart watch to work as a remote for your vehicle. Under Vehicle Remote, you’ll find the frequency key type and Federal Communications Commission ID, depending on the page. You also can select the model of vehicle. I selected a Chevrolet Traverse in this example. (Images 15 and 16) After you know what remote you’re generating, you can generate the remote. (Image 17) Note that you have to place the new remote in the proper position. (Image 18)
Remote and key renew: This also is found under Special Functions to renew remotes and remote head keys. You either can solder wires or use cradles that are sold separately. This won’t unlock all remotes.
Coil detector: Another Special Function, this simple test will tell you whether the Key Tool Max’s antenna ring is sending out a signal.
Bruce Horne is a locksmith who operates AAAA Key in Houston. He also is the automotive specialist at Banner Solutions.
