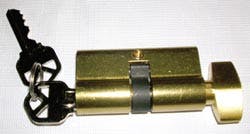
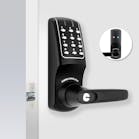
The profile cylinder has been making entries into the North American market through lock applications such as ready-made screen, atrium and storm doors that are using specialty application aftermarket locks. Unlike the standard mortise or key-in-lever cylinders, profile cylinders are larger and longer. The plug is normally positioned at the top of the profile cylinder, requiring the springs to push up on the pin tumblers in order to obstruct the shear line. When a properly bitted key is inserted into the plug, the pin tumblers are pushed down to align at the shearline.
Most of the profile cylinders are double-sided. This way, the lock can be operated from either side of the door, eliminating the need for additional components. The exterior of the double-sided profile cylinder is a key-operated lock mechanism. The interior can either be a key-operated lock mechanism or thumb turn. The cam, which operates the locking mechanism, is located between the exterior and the interior lock mechanisms.
Note: Most profile cylinders are interchangeable, having the same cam dimensions and retainer screw location. Profile cylinders are available in a variety of lengths, from approximately 1.20" to more than 3". Different size rosettes are available to compensate for door thickness.
To service the doubled-sided profile cylinders, a standard follower cannot be slid into the gap between the interconnected housings. For the sample profile cylinder, there is a gap of approximately 3/8" into which the cam is located. Since each plug is removed from its own end, specialized tools are required to keep the top pins and springs suspended within the housing when the plug is removed.
Several specialty tools are available for servicing profile cylinders, including specialized spring steel wires that clip onto the housing directly over the pin chambers to trap the top pins within the bible when the plug is removed. Another common tool is a multiple piece magnetic follower consisting of 10 round magnets each less than 3/8" thick, about the diameter of the plug. Being magnetic, each of the pieces attracts and can attach to each other, creating a near solid follower when placed one against another. Although non-magnetic or even wood dowel pieces could be used, the problem is ensuring they stay together to prevent a separation that could allow a top pin to slide between.
The plug diameter of a profile cylinder is approximately one-half inch, similar to most key-in-lever and mortise cylinders. Most profile cylinders use pin tumblers whose diameter is similar to the pin tumblers used in most conventional residential/commercial locks.
Profile cylinder plugs and thumb turns can be retained using C-clips or a screw that interconnects the cam to the ends of the plugs and/or thumb turn. There is normally minimal space between the housing and the cam. To service these profile cylinders equipped with C-clips, they must first be removed. Be careful, as some of these C-clips are made of malleable metal that will easily bend and become unusable. Others are made of spring steel. Some of the spring steel rings are made to break, requiring their replacement when the profile cylinder is serviced.
Profile cylinders are similar to other lock cylinders because they can have different keyways (some not common to the North American market). Depending upon the manufacturer, replacement key blanks may only be available from the lock manufacturer or a specialty key blank supplier.
Recombinating a profile cylinder may require special diameter pin tumblers. If conventional diameter pin tumblers are used, the manufacturer may incorporate varying length top pins. Some lock manufacturers use only one length of top pin for all of the pin tumbler lengths. Some profile cylinders are designed to use several lengths of top pins in order to balance the pin stacks. Because of profile cylinder design, we strongly recommend knowing the number of top pin lengths. If not, unload the top pins from the profile cylinder when recombinating. This way there will be no chance of overloading a pin chamber. If you unload the top pins, replace the springs as they receive additional wear because of their upside down operation.
Important: Before disassembling a profile cylinder, be sure to mark or photograph the positions of all the components.
SERVICING TIPS
For the purpose of this article, we will service a profile cylinder that does not have removable top loading caps. The profile cylinder is operated by a five-pin tumbler key that has a keyway that can accommodate a Kwikset blank. The exterior cylinder contains five pin tumblers. The interior cylinder is a thumb turn. To keep the top pins and spring within the bible, we use the Keedex K-19 Profile Cylinder Follower.
NOTE: This procedure is normally used with a double-sided profile cylinder rather than a single-sided profile cylinder. Instead of using the magnets, a single-sided profile cylinder may be recombinated using a hollow follower.
Step 1. Remove the profile cylinder from the lock. Profile cylinders are usually secured within the lock using a screw. The middle of the profile cylinder housing has a threaded hole to accommodate the screw. This screw is usually accessible by removing the edge plate.
Note the location of the cam. Mark the position of the cam so orientation will be correct during re-assembly.
Step 2. Remove cylinder retainers. These may be C-clips or screws, depending on the design of the profile cylinder. This profile cylinder was equipped with two C-clips. When removing C-clips, try placing pressure against one end of the clip and pushing against the other. This way the clip will slide up enough for a small blade screwdriver to lift it off.
Step 3. Carefully slide the thumb turn out of the housing. A spring loaded ball bearing slides into a detent when the thumb turn is vertical.
Step 4. Insert an operating key into the cylinder and rotate approximately 90 degrees. If no key is available, manipulate the tumblers in order to rotate the plug.
Step 5. Slide the plug out slightly in order to disengage driver from the rear of the plug. Do not slide too far as the last pin chamber may become exposed and the top pin and spring could slide out.
Step 6. Disengage the driver from the cam. Once disengaged, remove the cam. Then slide out the driver. On some double-sided profile cylinders there is a cam interconnect for each plug. These parts can be larger than the middle slot of the housing. In these cases, it may be necessary to pull one or both plugs out far enough to allow the interconnect to clear the cam. If a top pin and spring slide out, this can be repaired later.
Step 7. Once the cam and driver/cam interconnect are removed, insert one of the magnets through the slot for the cam into the housing containing the plug.
Note: To make things easier, place one magnet on the body of the profile cylinder. This will attract the magnet being slid into the housing and keep it in place. Do not place the magnet too close, as it will slide and contact the other magnet.
Step 8. Continue to slide one magnet at a time through the cam slot into the housing as you push out the plug. Continue to insert follower pieces until the plug clears the pin chambers, which is usually about four or five magnets. Remove the plug from the housing.
Step 9. Combinate the plug as required.
Step 10. Install the top pins as necessary into the housing. Usually only the last one or two pin chambers become exposed and need the top pins reinstalled.
Step 11. Insert the key into the plug.
Step 12. Slowly insert the recombinated plug into the housing.
Step 13. As the plug is being inserted, remove each piece of the magnetic plug that becomes exposed at the cam opening. Use a small screwdriver to separate the magnet pieces.
Step 14. As the last magnet piece is removed, carefully insert the driver.
Step 15. Install the cam according to the marking prior to disassembly. It may be necessary to slide the plug out slightly in order for the cam to slide over the driver. Test the operation of the key.
Step 16. If the lock mechanism operates properly, remove the key from the plug.
Step 17. Install the thumb turn making sure the ball bearing slides into the housing. Test the operation of the thumb turn.
Step 18. Install the two "C" clips. Test cylinder for proper operation.
The use of a magnetic follower makes servicing a profile cylinder easier. These Keedex magnets are very strong and stay together, literally forming the individual pieces into a single length follower.
For more information on the Profile Cylinder Follower, contact your local locksmith wholesaler or Keedex, Inc., 12931 Shackleford Lane, Garden Grove, CA 92841. Telephone: 714-636-5657. Fax: 714-636-5680. Web site: www.keedex.com.


