Schlage introduced the Primus high security lock cylinder during the fourth quarter of 1988. Schlage Primus was introduced with key-in-knob/lever, rim and mortise lock cylinders. The Primus cylinder is a modified six-pin tumbler conventional Schlage lock cylinder. A sidebar operated by five finger pins provides the additional level of security. To accommodate the five finger pins, a Primus key has a secondary bitting on the side of the blade.
Each Schlage Primus key has the word “Primus” stamped into the back of the pyramid-shaped key bow and lock cylinders have “Primus” stamped into the face of the plug. When a properly cut Primus key is inserted into a properly combinated Primus lock cylinder, each of the side bitting under cuts lift and rotate the finger pins until their notches (in the back of the finger pins) align with the notches in the side bar. When all of the notches align, the side bar retracts into the body of the plug. With the regular pins aligning at their shear line, the plug is free to rotate and operate the locking mechanism.
Primus was Schlage’s entrance into the high security market place with patent protection. The Primus line has expanded to include conventional (key-in-lever and knob) cylinders, mortise cylinders, rim cylinders and large format interchangeable core. The original Primus patent, U.S. 5,715,717 has expired. In 2007, Schlage patented the Primus XP high security lock cylinder. As part of the new patent, a seventh finger pin was added, providing additional security.
Schlage Primus and Primus XP lock cylinders ‘six -pin tumbler specifications are identical to the Schlage Classic, from bottom, top and master pins to springs and key cutting. Schlage Primus and Classic six-pin tumbler bitting instructions include using the three lengths of top pins.
The original Primus patent has six finger pins, differentiated by depth and angle. They are:
- Finger Pin 1: Angle Left, Depth Shallow
- Finger Pin 2: Angle Left, Depth Deep
- Finger Pin 3: Angle Center, Depth Shallow
- Finger Pin 4: Angle Center, Depth Deep
- Finger Pin 5: Angle Right, Depth Shallow
- Finger Pin 6: Angle Right, Depth Deep
With Schlage patent number 7,159,424, Primus XP has incorporated a #7 finger pin that provides additional security. Patent protection is into 2024. Finger Pin 7’s Angle is Right and Depth is Extra Shallow.
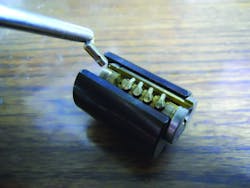
To read the finger pins, hold a finger pin with a pair of tweezers using the two side bar cutouts. Hold the finger pins vertical with the pointed tip down. If the pointed tip is slight turned to the left, it is a left angle finger pin. If the pointed tip is slight turned to the right, it is a right angle finger pin. If the pointed tip is straight away, it is a center finger pin.
Finger pin depth is determined by the proximity of the cutouts to the pointed tip. If cutouts are closer to the tip, the finger pin is shallow (or extra shallow XP). If notches are farther away from the pointed tip, the finger pin is deep.
All Schlage Primus and Primus XP keys have six pin tumbler cuts and five Side Bit cuts that are read from bow to tip. When a Primus key is inserted into a lock cylinder, each side pin cut in the key raises and swivels the finger pin in order to align the notches in the pin with the notches in the side bar. This means that each side bit cut is read from the lowest point to adjacent high point.
There are three high point heights. A number two, four or six finger pin has a deep cut just above the base of the blade (lowest). A number one, three or five cut is shallow, having the side bit cut not as deep (middle). A number seven finger pin has the side bit cut with the shallowest bitting (highest).
An improper finger pin will not be at either the correct height or angle for the side bar. If the two notches in each finger pin are not in the proper position on the side cut, the notches will not rotate to the correct position. The notches will not align with the side bar or let the key rotate the plug. The side bar is non-handed.
Note: Primus and Primus XP CP, CEP, EP, EFP, FP and FGP keyways can be used with Classic Schlage cylinders using the obverse (C, E, F, G) keyways. The Primus keys with the same obverse keyway are compatible. For example, a “C” keyway Primus key is designed to enter the “C” keyway Classic lock cylinder and if compatibly combinated, operate these lock cylinders. The conventional “C” keys will not enter or operate Primus lock cylinders.
Primus and Primus XP lock cylinders can be identified from the front by the word Primus stamped into the plug face. Primus mortise, rim and modular mortise and rim cylinders have a single screw securing the cam onto the plug assembly. Schlage classic mortise and rim cylinders have two screws. Classic key-in-lever cylinders tailpieces have notches for locating the driver bar vertically or horizontally at approximately 11 and 2 o’clock. The 11 o’clock position is vertical.
Primus key-in-lever cylinders tailpieces have notches for locating the driver bar vertically or horizontally at approximately 7 and 2 o’clock. The 2 o’clock position is vertical. The Primus modular KIK and KIL lock cylinders have only one notch at approximately 2 o’clock.
Combination Changes
Changing the combination on a Primus lock cylinder requires removing and replacing the top, master and bottom pins as the top pin are sized for different pin lengths. Replacing any or all of the five finger pins is only necessary if the keys have been replaced using a different side bitting.
Servicing and changing the six pin tumblers’ combination on a Primus lock cylinder requires maintaining the finger pins and the spring loaded side bar in their proper locations. The finger pins load from the bottom of the plug. When loading an empty plug or changing or replacing the finger pins, they can be loaded with the plug in the Schlage plug holder.
Schlage Primus lock cylinders are not designed for top loading. A flat brass spring retainer is crimped into place. Removing the spring retainer is not advised for combination changes.
Recommended tools for changing the combination of a Schlage Primus lock cylinder are:
Schlage Primus Plug Holder or similar tool that has a groove in at least one side of the inside diameter. This groove is required in order to insert or remove the key while the plug is in the plug holder. If there is no groove, the key cannot be removed, as the side bar must be able to extend to the locked position as the key is being removed.
Schlage Follower with a section cut out in order to remove any master pin without having to completely unload the shell. The removed section of the follower is not large enough for a top pin to exit a pin chamber.
If the lock cylinder is equipped with a screw or screws securing the cam, a Phillips head screwdriver is necessary.
To simplify the combination change, a Cap Removal Tool depresses the cap pin and permits removal of the cap without have to depress the pin.
A pair of locksmith pin tweezers that have the tip either formed or machined to accommodate a pin tumbler.
A Key Gauge is needed for standard Schlage depths of cut.
Important: When changing the combination, be extremely careful, a plug holder is recommended to maintain pressure on the side bar. If pressure is not maintained on the side bar, it will spring out and the two side bar spring are difficult to find especially if you only have those two springs.
For this article, I will load and assemble a key-in-lever lock cylinder using the key.
The first step is to insert the empty plug into the Schlage Loading Tool. Then insert the two side bar springs into their openings. Slide the side bar into position
Rotate the plug approximately 270 degrees clockwise so the finger pin chambers are visible and the side bar is in a cutout. Having the side bar in a cutout allows the finger pins to be installed.
Once the finger pins are installed and key is inserted, if the plug will rotate a few degrees, requiring the side bar to retract into the plug, it is properly loaded. If not remove the plug from the loading tool being careful not to let the side bar fly. Carefully remove the side bar. The finger pin notches within the side bar slot should be perpendicular to the plug and centered within the slot.
Carefully rotate the plug approximately 270 degrees counterclockwise. The pin tumbler chambers should be vertical. With the key inserted into the plug, load the six pin chambers. For our purpose, the lock cylinder was not master keyed.
If the lock cylinder is master keyed, determine the depths of the bottom pins and master pins. Insert the bottom pins first. Then place the master pins above the bottom pins in their respective positions. Insert the first key into the plug. The bottom pins (and some or all of the master pins if equipped) will align at the outer diameter of the plug. If all of the master pins do not align, note which positions that do. Insert the second key, the master or a change key and make sure all of the master pins for one or the other key align at the outer diameter of the plug.
Once the keys have been checked, the next step is to unload the top pins from the shell. This is important because Schlage has three lengths of top pins to keep the pin stacks balanced. Size number one is .235” and is designed for plug total per chamber of 0, 1, 2 or 3. Size number two is .200” and is designed for plug total per chamber of 4, 5 or 6. Size number three is .165” and is designed for plug total per chamber of 7, 8 or 9. Plug total includes the size of the bottom pin and any master pin.
When loading the shell, use new springs with the correct top pins, remove the springs and replace them.
Now the plug is ready to be inserted into the shell. Before inserting the plug, make sure the edge of the shell’s bible that will contact the plug face is the flat edge. The angled edge is next to the cap. If the plug is inserted backwards, the key will not be able to be removed.
Insert the plug into the shell with the pin chambers at approximately a 45-degree angle to each other. This way, if the lock cylinder is master key, there is no possibility any of the top pins will slide into a pin chamber.
Position the plug with the keyway vertical. Place the rear of the plug against the flat end of the follower and gently put pressure against the follower.
Carefully continue to place gentle pressure against the follower until the plug sides into the shell. Carefully test the operation of the lock cylinder. When satisfied, remove the key and insert the cap spring, cap pin, driver and install the cap. Snug the cap in place. Too tight, the key may not enter the keyway. Too loose, the key may not be able to be removed. Test the operation of the keys and assemble the lock cylinder.
Test the operation of the lock cylinder with each key.
Drawings for this article were obtained from the Schlage Primus© Service Manual © 2010. For more information, contact your local locksmith distributor or Schlage Lock, Web Site: http://w3.securitytechnologies.com.


