Dortronics Provides A New Way To Electronically Secure Storefront Doors
Electrified lock choices are limited when installing electronic access control on a narrow stile aluminum glass storefront door equipped with a pivoting deadbolt. As far as I am aware, no electric strikes will operate a standard aluminum storefront door lock with a 1-3/8" throw pivoting bolt. The keeper in most electric strikes is designed to accommodate up to a one-inch throw bolt.
Therefore, electrification options are narrowed down to the following four options:
- Deadlatch and electric strike
- Electrified deadlatch
- Electronic deadlatch
- Electromagnetic lock
The deadlatch options require either retrofitting the pivoting deadbolt or adding the second lock to the door. This can be difficult depending upon the location of the original pivoting deadbolt lock. According to the NFPA 101 Life Safety Codes and building codes specifications, securing a swinging door is normally accomplished by a deadlatch or deadbolt located between 34” and 42” above the finished floor. The 2010 ADA Standards for Accessible Design states hardware required for accessible door passage shall be mounted no higher than 48" above finished floor.
The choice of the electrification method depends upon the reason for electrification that can include daytime operation, security, primary/secondary locking mechanism, cost, etc.
When installing an electromagnetic lock onto aluminum glass door, the standard position is along the header. In this configuration, when the door is secured electronically, there is no locking mechanism activated along the swing side of the door.
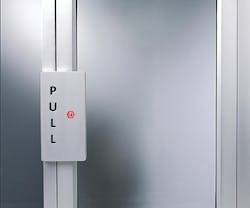
A new solution to electrification of the storefront door is the Dortronics ML-1100 Series Mortise Lock & Pull. The lock mechanism is an electromagnet installed into the swing side aluminum jamb. The armature is concealed, mounted into the handle, which is installed onto the pull side of the flush mount doors' stile. This configuration allows the magnetic force holding the armature at or near the vertical centerline of the aluminum glass door, providing evenly spaced holding force and limiting the ability to rack the door.
Note: Pull plates are installed at a centerline of 42".
With this type of installation, the handle pulls directly against the holding force of the electromagnet. The ML-1100 uses a 10-inch long, 1,000-pound holding force electromagnet. The Fail Safe electromagnet power draw is 360mA @24VDC.
The handle assembly is machined from a solid aluminum block. It is 12" long by 6-1/4" wide by 1-3/8" thick. The handle is available in six finishes in addition to aluminum.
Because the ML-1100 was initially developed for New York City's Public Housing projects, it stands up to high use, abuse and vandalism. The resulting benefits include a concealed locking mechanism and concealed fasteners on the exterior of the door.
Installation of the Dortronics ML-1100 requires removing of the front of the jamb to accommodate the electromagnet and drilling four holes in the door stile to mount the handle assembly.
For the purpose of this article, we installed the ML-1100 onto a piece of aluminum jamb and a narrow stile. Door stiles are available in three sizes: narrow stile is 2" wide, medium stile is 3-1/2" wide and wide stile is 5" wide. The aluminum jamb front is 1-3/4" wide and the wall thickness is approximately 1/8".
To cut out the opening for the electromagnet, we used a steel rule with zero point in the middle to locate the vertical centerline of the jamb. We used a combination square to draw the vertical centerline, the top and bottom lines and the side lines.
We measured the distance between the base of the mounting block and the center threaded opening. An automatic center punch located the hole along the vertical centerline of the jamb front.
Four holes were drilled using a step drill bit into the front of the jamb, one at each corner to make it easier for the jigsaw to cut the opening. Once the opening had been cut, the edges were filed smooth to accommodate the electromagnet.
The electromagnet was slid into position making sure the centerline mounting hole was in position. Some filing was required to properly locate the electromagnet.
When the alignment was correct, we used a self-centering drill bit to locate and drill two pilot holes for each mounting block. We enlarged the holes to accommodate the security Torx head mounting screws in the mounting blocks placed within the jamb. Any burrs created from drilling the holes were removed to ensure the blocks mounted flush. The mounting blocks were installed into the jamb using the provided screws.
Next, four handle mounting holes were drilled. To provide maximum holding force, the two outside holes away from the magnet and the two center holes were drilled. A custom made drill fixture was used to ensure the holes were drilled straight. The four 5/16" diameter holes were drilled through both the front and rear of the stile. On the interior side, a countersink was used to recess the screw heads.
The electromagnet was installed into the jamb. The four stainless steel mounting screws were started before any screw was tightened. Depending upon the application, thread locker may be recommended to thwart the screws from being removed.
The next step was to mount the handle assembly. Four long stainless steel Torx head screws were provided. Thread locker was used to ensure the handle mounting screws do not loosen.
Four washers were used to set the depth of the armature, positioned on the mounting screw between the armature and the handle to raise the armature. Washers were removed to lower the armature.
The handle should be flush with the front of the jamb when the electromagnet is powered. This will minimize the possibility of separating the armature from the electromagnet and gaining access.
When the armature is in position, powering the magnet will draw the armature flush, securing the door in the closed position. Since electromagnets are fail safe devices, power is required to keep the door locked.
In addition to finish options for the ML-1100, the Magnetic Bond Sensor (MBS) option provides a signal when the lock is properly energized and the magnetic field is holding the armature flush.
The Dortronics ML-1100 Series Mortise Lock & Pull provides your customers with another choice for electronically securing storefront aluminum glass doors.
For more information, contact your local locksmith distributor or Dortronics, 1668 Sag Harbor Turnpike, Sag Harbor, NY 11963. Telephone: 800-906-0137. Web Site: www.dortronics.com.
To read additional Locksmith Ledger articles on Dortronics, visit http://tinyurl.com/dortronics813.


