Schlage introduced the Everest 29 Series of lock cylinders and keys in 2012, patent protected through July 2029 against infringement including unauthorized duplication. Included in this introduction is the Everest 29 Primus XP, the highest level of mechanical lock patented security available from Schlage. An Everest 29 Primus XP cylinder is equipped with a conventional six-pin tumbler lock mechanism and a separate five-finger pin sidebar lock mechanism whose bitting is undercut in the side of the blade.
The Everest 29 Primus XP continues the Everest Primus legacy, permitting backwards compatibility with Everest 29 Primus, Everest Primus XP and Everest Primus, while maintaining forward upgradeability of the lock cylinders. Everest 29 Primus XP S and T keyways are backwards compatible with the C and D Everest keyways. Everest C and D keys are not forward compatible with Everest 29 Primus XP lock cylinders.
Everest Primus lock cylinders and keyways are not compatible with the Primus lock cylinders. Primus and Primus XP cylinder use the Classic Keyways, which include the C, E, F, etc.
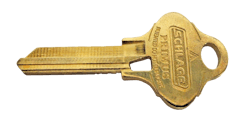
The Everest 29 Primus XP key bow shape is 20 percent larger than the Classic key bow. The word “Primus” and the Everest logo are stamped into the front of the bow. Everest 29 Primus XP keys can be easily identified by the trapezium, an irregular quadrilateral hole cut into the base of the head. The purpose of this through-cut is to maintain the key blank in position during the undercut machining process.
Everest 29 Primus XP conventional and Large Format Interchangeable Core lock cylinders continue to have “Primus” and the Everest logo stamped into the face of the plug. All Schlage Primus, Primus XP and Everest 29 Primus XP keys have six pin tumbler cuts and five side bit cuts. Each side bit cut begins at the lowest point onto the adjacent high point. The cuts are read from bow to tip.
The conventional lock mechanism pin tumblers are identical to those used by the Schlage Classis, including the top, master and bottom pins as well as the spring and key cutting specifications. Continuing with the Primus XP, the Everest 29 Primus XP lock cylinders have seven finger pins, which are differentiated by depth and angle. They are:
- Finger Pin 1: Left, Shallow
- Finger Pin 2: Left, Deep
- Finger Pin 3: Center, Shallow
- Finger Pin 4: Center, Deep
- Finger Pin 5: Right, Shallow
- Finger Pin 6: Right, Deep
- Finger Pin 7: Right , Extra Shallow
When a correctly cut Primus key is inserted into a Primus lock cylinder, the conventional pin tumblers raise as the key slides into position. Each side pin cut in the key raises and swivels the finger pin as the key enters, aligning the notches in the finger pin with the notches in the sidebar, permitting the sidebar to retract within the body of the plug. An incorrect finger pin will not be at the correct height or angle for the sidebar. If the notches do not align, the sidebar will not retract nor will the key rotate the plug.
Everest 29 Primus XP lock cylinders can be identified from the front by the word Primus stamped into the plug face. The Primus mortise and modular mortise cylinders have a single screw securing the cam onto the plug assembly, unlike Schlage classic mortise cylinders which have two screws.
Classic key-in-lever cylinders tailpieces have notches for locating the driver bar vertically or horizontally at approximately 11 and 2 o’clock. The 11 o’clock position is vertical, which is also used by the rim cylinders.
Primus key-in-lever cylinders tailpieces have notches for locating the driver bar vertically or horizontally at approximately 7 and 20 o’clock. The 2 o’clock position is vertical. Primus modular Key-In-Lever lock cylinders have only one notch at approximately 2 o’clock.
Because Primus lock cylinders use two separate locking mechanisms, changing the combination requires only changing the pins with six conventional pin tumbler chambers. This does not affect the bitting of the five finger pins. When changing the combination, use the Schlage Plug Holder to keep the five finger pins and sidebar in location.
The different Primus lock cylinders are not designed for top loading. This is because the flat brass spring retainer is crimped into place. Removing the spring retainer is not advised for combination changes as it increases the possibility of the retainer disengaging.
To simplify the disassembly and assembly procedure, use a cap removal tool to depress the spring-loaded cap pin in order to remove the cap. This eliminates the need for an awl or similar tool to depress the cap pin.
Removing The Plug
To service the finger pins, the Schlage Everest 29 Primus XP plug must be removed from the housing. As the follower pushes out the plug, carefully keep the sidebar pressed against the plug. Slide the plug into the plug holder, keeping the sidebar trapped within the plug holder. Remove the pin tumblers the six pin chambers. This way the key can be inserted and removed.
Rotate the plug within the holder until the finger pin chambers are visible and the sidebar is in a notch. Positioning the sidebar within a notch allows the key to be inserted and removed and the finger pins to be removed and installed.
Finger pins are differentiated in two ways - depth of the notch and the angle of the finger. Including the seventh finger pin, there are three different depths: shallow, deep and extra shallow as determined by the distance between the finger and the slot. The second variation is the angle from the slot to the tip of the finger pin. There are three different angles: left, right and center. A left angle finger pin points to the left from the center of the notch. A center finger pin points away from the center of the notch. A right angle finger pin points to the right from the center of the notch.
Decoding Finger Pins
For this article, I will remove, decode and reinstall the finger pins. To decode the finger pins, remove one finger pin. Check the depths, first for the shallow and deep. If there are three finger pin depths, the shallowest has the least distance between the finger and the slot. The deep has the greatest distance between the finger and the slot.
To decode the finger pins using a key, insert the key into a Primus cylinder that does not have finger pins. Mark a line perpendicular along the bottom of the key blade at the center of each finger pin chamber. Remove the key from the plug. If the deepest point on the side cut is to the left, right or center of the finger pin chamber line, this is the finger pin angle to use.
Of the five cuts, the cuts that are closer to the bottom of the blade are the deeper cuts. Looking at the undercut side of the key, determine which cuts are deep, shallow or extra shallow. Remember: A number seven finger pin is a right angle finger pin only.
Once the depths and angles for each finger pin are determined, insert the first finger pin beginning at either the bow or the tip of the plug. After one finger pin has been inserted, insert the key. If the finger pin is correct, the sidebar will retract as the key rotates the plug a few degrees. If the finger pin is correct, repeat the operation inserting the next finger pin into the next pin chamber. If not, repeat the procedure and determine the correct depth and angle.
Note: I had a problem determining a finger pin. I chose the correct finger pin; however, the pin I chose from the kit had been placed in the wrong tray position. Using a correct finger pin permitted the plug to rotate.
Carefully rotate the plug until the pin tumbler chambers are vertical. With the key inserted into the plug, load the six pin chambers. Check to be certain all of the keys operate the plug. Once the keys have been checked, the next step is to unload the top pins and springs from the shell.
This is important as Schlage has three lengths of top pins to keep the pin stacks balanced. Size number one is .235”, designed for plug total per chamber of 0, 1, 2 or 3. Size number two is .200” , designed for plug total per chamber of 4, 5 or 6. Size number three is .165” , designed for plug total per chamber of 7, 8 or 9. Plug total includes the size of the bottom pin and any master pin. When loading the shell, use new springs with the correct length top pins.
Lock Cylinder Assembly
The lock cylinder is ready to be assembled. Before inserting the plug, make sure the edge of the shell’s bible that will contact the plug face is the flat edge. The angled edge is next to the cap. If the plug is inserted backwards, the key will not be able to be removed.
If the lock cylinder is master keyed, use a "set-up" key to insert the plug into the shell having the plug pin chambers at approximately a 45-degree angle to the shell pin chambers. This way, there is no possibility any of the top pins will slide into a pin chamber. If a correctly cut key is not inserted in a Primus cylinder, the sidebar will not retract and the plug will not be able to be inserted in the body.
Insert each key and test the operation of the lock cylinder. When satisfied, carefully remove the key and finish assembling lock cylinder. For this article, I am using a K-I-L lock cylinder and have to insert the cap spring, cap pin, driver and install the cap. Always test the operation of the lock cylinder with each key after it is fully assembled.
Everest 29 Primus XP keyway locks and keys are available in different levels of exclusivity through geographic controls. All key sections are available at all levels of security. They can be integrated with non-Primus lock cylinders eliminating the need to replace all lock cylinders.
Schlage offers three-year Everest 29 Primus product warranty and a limited life-time warranty against key breakage of Everest 29 Primus keys.
For more information, contact your local locksmith distributor or Schlage at: Web Site: www.Schlage.com.
Schlage Primus Servicing Tools
Tools for changing the combination of a Schlage Primus lock cylinder include the new Schlage Plastic Follower (Part # M504-548). This follower has a ramped milling halfway along the length in order to check for and remove master pins. The opposite end has a narrow tab that is designed to slide into the slot in the rear of the modular plugs for better alignment.
Schlage Primus Plug Holder (Part # 40-066) has a groove to accommodate the plug when the sidebar is extended. This groove is required in order to insert or remove the key while the plug is in the plug holder. If pressure is not maintained on the sidebar, it will spring out and the two sidebar springs are difficult to find.
Schlage Primus Finger Pin Kit (Part # 40-070) contains the seven depths of finger pins, sidebars, plug holder, sidebar springs and finger pin springs.


