Our second installment in the new Back to Basics series will cover shimming a lock. This is part of lock servicing. If you (or your customer) do not have a key for a lock, this is a great way to start making a key.
We start by taking off the back clip or the retaining clip. Whatever is holding your lock, whether it is a cap screw or a retaining clip – just remove it out of the way. (Photo 1)
Photo 3 shows what the cylinder looks like and what the shear line is when we actually meet the shearline with the shim. It’s important to understand all the functions of the lock.
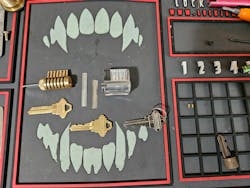
In Photo 4, we have an SC4 key blank. Photo 5 shows our shim. A shim is a very thin piece of metal that will actually work itself in between the top pin and the bottom pin (Photo 6) and find the shear line automatically and hold it so you don’t have to pick it the conventional way.
We need to make sure that the shim is directly in line with the top plug and with the bible and all the top pins (Photo 7). Photo 8 is a very close-up view of what that shear line looks like. In each pin stack, there is a dark line in between the two pieces of brass. That is the shear line and that is what the shim is quite literally “shimming” itself in between.
We’ve got quite a few of them shimmed now, probably three to four of the pins inside this lock are shimmed. (Photos 9 and 10). The way this is working is the pins ride up the angle of the key and down as you’re actually shimming the lock. (Photo 11)
Now we’ve got it turned over (photo 12) and the way that those pins are riding up and down the angle, it eventually goes through all the different heights and depths. When it reaches the shearline, the shim slides in between the two pins because that’s the only place it has to go. (Photo 13)
Photo 14 shows that you can leave the shim in place and put the follower into the lock and it will help prevent any accidental turning or rotation of the plug that was not intended.
Photo 15 shows a close-up view of the edge of the shim. When you encounter security pins, spool pins, t-pins or serrated pins, any top or bottom pins that have any grooves or cuts or marks on them will ruin a shim like this.
We are going to start this process again from start to finish. (See accompanying video) Our goal is to get the lock cylinder open without a key. However, for educational purposes, we do have a working key to show that the lock is functional. Notice that the angle of the key is moving all the pins to their maximum depths and maximum heights.
We start off by inserting the shim into the back side of the lock after any retaining clip or cap screw has been removed.
The shearline is that dark mark in between the two pins. Here I’ve got serrated pins. You can see the extra serrations in them (Photo 16). In this case, only shim the lock on the downstroke against the bottom pin that does not have the serrations in it.
You can use the follower to help push the plug out so you don’t accidentally lose any pins in that gap.
Wayne Winton is the owner of Tri-County Locksmith Services, located in Glenwood Springs, Colorado. For more information, check out Wayne’slockshop.com and lockreference.com.
Basic Training
Locksmith Ledger is excited to kick off our Back to Basics series, in partnership with Wayne Winton. This series is a great educational resource for new locksmiths and lockshop employees and can be a good refresher course for even veteran locksmiths. We recommend ordering a couple pizzas and gathering your staff around the computer during lunch to watch the included training videos.
In installment one, we started from the very beginning. The topic was “How to Rekey a Pin Tumbler Lock Cylinder.” Read the article at https://locksmithledger.com/53068086 and then click on the QR code to watch the video, which includes bonus information.
We also highly recommend checking out Winton’s Locksmith Live series, starting with “What to Know Before You Become a Locksmith” at https://www.youtube.com/watch?v=XObEsAo0t7c. It contains some great advice on running your business successfully, avoiding legal pitfalls and protecting your company assets.
Stay tuned for further educational articles and videos and let us know if there’s a top you would like us to cover.
Check out Wayne Winton's full video libraries at Wayne’slockshop.com and lockreference.com or visit the Facebook Group Locksmith Nation (https://www.facebook.com/groups/LocksmithNation) to sign up for future Locksmith Live sessions, held on Monday nights at 4 p.m. Mountain.
Wayne Winton
Wayne Winton is the owner of Tri-County Locksmith Services, located in Glenwood Springs, Colorado.


