Spare-Tire Locks Create Unique Challenge
When the weather is good, classic autos pop up all around the country. However, before those classic autos can draw the love and admiration of those who see them, they must be restored.
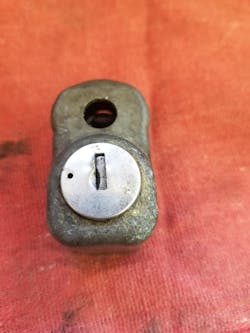
Part of the restoration process includes making keys for the spare-tire locks found on classic Chevrolet Corvettes, and, recently, we got to handle that job on two models: one from 1968 and another from 1970. The locks referenced on both models were used from 1968 to 1982, but little information on servicing those locks is available.
The Job
The first order of business is to remove the rear bolt assembly, which holds the tire to the back of the Corvette. It consists of three pieces: the bolt assembly, the bracket and the nut. (Image 1)
Then, you have to remove the lock from the rear bolt assembly. The head of the rear bolt assembly proved exceedingly difficult to remove with the lock attached and took a little bit of luck. To remove the lock, shims were inserted into the small space between the lock and the head of the rear bolt assembly. (Image 2) After the shims are inserted, a lot of time and patience is involved in getting the head to align on the shims to pop out of the lock assembly. (Image 3)
To service the spare-tire lock, the cylinder must be picked clockwise. We picked the lock by using an HPC hook pick and a standard tension rod. After the cylinder has been picked, press the roll pin on the left side of the lock face inward to release the cylinder from the lock housing. (Image 4) The lock cylinder is made of pot metal, unlike the housing, so be careful when servicing the cylinder to prevent damage.
The spare-tire locks can use different keyways depending on the production year, as ours did, so it’s important to predetermine the keyway used if you’re trying to match original specifications. We used the Ilco Auto Reference Guide to cross-reference the appropriate keyway. (Image 5)
To reinsert the cylinder back into the housing, you insert the lock cylinder with the key as far as it will go before the cylinder stops. After the stopping point is reached, push down on the cylinder retainer pin. (Image 6) With the retainer pin depressed, the lock will click back into its operable position.
After being cleaned and serviced with some brass cream and a buffer wheel, the lock looks like new. The lock is reinstalled onto the rear bolt assembly, and it’s now ready to take its place back on the vehicle. (Image 7)
If the rear bolt assembly or the lock has to be replaced, that will add to the service charge, and an optional silicone lock cover, which helps to protect the lock while not in use, adds a few more dollars.
Although they might be out of sight, the spare-tire locks are an important piece to the Corvette restoration puzzle, even if they don’t have a key.
Herman Manzanares III, RL, is co-owner of Los Alamos Lock & Key in Los Alamos, New Mexico. He has 25 years of locksmith experience. He can be reached via the web at www.losalamoslock.com.
Herman Manzanares III, RL
Herman Manzanares III, RL, is co-owner of Los Alamos Lock & Key in Los Alamos, New Mexico. He has more than 25 years of locksmith experience. He can be reached via the web at www.losalamoslock.com.


