What can locksmiths do when transponder-equipped keys begin to wear beyond their
operational life? Transponder keys less chip can be a practical way to replace transponder-equipped keys that are worn or broken.
Transponder-equipped keys have been sold in the North American market for just about a decade. That’s 10 years; it’s amazing how time seems to fly by. Like cylindrical keys and non-transponder-equipped automotive keys, 10 years of use can not only round off the sharp edges of the bittings, but also in some cases affect the operational tolerances. What can locksmiths do for their customers when transponder-equipped keys begin to wear beyond their operational life?
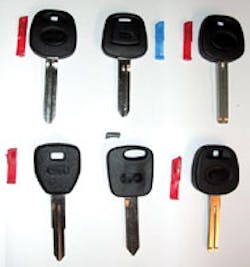
Jet Hardware Mfg. Corp. now offers transponder-equipped key blanks with or without the transponder chip. Locksmiths have the choice to either program a new transponder key or remove the transponder chip from the owner’s key and install it into the replacement “LC” (less chip) key blank.
At the time of writing this article, Jet Hardware Mfg. has six key blanks available “LC”. They are:
— Ford H-72-PHT “LC”
— Honda HD106-PHT “LC”
— Lexus TR48-PHT “LC”
— Lexus TR49-PHT “LC”
— Nissan DA34-PHT “LC”
— Toyota TR47-PHT “LC”
Depending upon the key style and the transponder, the “LC” key blanks are equipped with the cap or sleeve that secures the chip.
NOTE: Removal of the chip from a worn key varies depending upon the manufacturer and transponder. Some are secured by a cap or sleeve that is either welded in place or are press fit. Others are molded into the plastic bow. However the transponder is installed, care must be taken when removing it to avoid damage.
For the purpose of this article, Jet has provided a Ford H72-PHT transponder-equipped key blank and a Toyota TR47-PHT transponder-equipped key blank along with a Ford and Toyota transponder key blanks “LC”. For the H72-PHT key blank, Ford uses a glass encased transponder. A plastic band then surrounds the transponder. The Ford key uses a supplied black plastic cap to secure the transponder within the bow.
The Toyota transponder is different; it is less than half the length and about one-third the thickness of the Ford chip in the H72-PHT key. This Toyota chip has a flat elongated shape. One end is wider than the other. One side is curved and the other side is straight. The transponder is located in the supplied red sleeve when installed.
The Ford chip is secured into the key bow by a plastic cover. The cover is approximately 1/8” thick, and slides over the plastic banded glass transponder. The Toyota chip rests in a slot in the sleeve.
NOTE: Jet does not use any type of adhesive to secure the covers or sleeves within the transponder key bows.
Removing The Chip From The Jet H72-PHT Key Bow
Step 1. Use a utility knife or similar tool to slide between the bow and the plastic cover. Once beneath the cover, carefully lift one end. The utility knife has a sturdy blade and did not bend when the cover was disengaged.
Step 2. Using you finger, lift off the cover.
A plastic band surrounds the chip. There is a bit of room along the middle of the band on each side.
Step 3. Slide a hook-shaped lock pick or similar tool down between the key bow and the outside of the plastic band. When down part way, turn the pick so the tip of the blade is placing pressure against the band.
Step 4. While maintaining turning pressure on the pick, slowly begin to pull the pick with the transponder chip out of the key bow.
When the transponder chip was removed from the bow and the plastic band removed, the wrapped wire antenna was close to the key blade.
NOTE: When removing the transponder chip from the key bow, be aware of its positioning. A reversed transponder chip may not properly operate.
The Jet transponder key blank “LC” comes with a cover or sleeve.
Step 5. Originate or duplicate the depths of cuts onto the H72-PHT-LC. Test the operation of this new key to be certain it operates the vehicle. Use a lock other than the ignition to test the operation.
Step 6. Slide the transponder chip into the newly cut key. Be certain the Ford chip is inserted into the key bow with the wire wrapped antenna closest to the key blade.
The cover is on an angle with the lower end having an extended leg. The extended leg should be placed at the edge of the bow, with the flat edge towards the center of the bow.
Step 7. Slide the end of the cover with the leg into the transponder chip opening in the key bow. Jet Hardware recommends using a small amount of Lok Tite™ to secure the cover in place.
IMPORTANT: Before using any adhesive, be sure to test the operation of the key to make sure the engine will start.
Step 8. Slide the cover in place using your fingers or the plastic pick handle. The pick handle can be used to adjust the positioning.
When installing a customer’s Toyota chip into the TR47-PHT-LC, use a utility knife or similar tool to carefully raise the sleeve out of the customer’s Toyota key. Once the sleeve has been raised enough, use your fingers to carefully remove the sleeve from the key bow.
The Toyota transponder chip is located in a slot in the sleeve with the wider edge at the top and the narrower edge at the bottom. The flat side is against the sleeve.
Originate or duplicate the depths of cuts onto the TR47-PHT-LC. Test the operation of this new key to be certain it operates the vehicle. Use a lock other than the ignition to test the operation.
Move the chip onto the sleeve supplied with the Jet TR47-PHT-LC, making sure it is properly aligned. Position the sleeve with the curved portion having the rounded edge towards the edge of the bow. Carefully slide the sleeve with chip into the new key bow.
Jet Hardware recommends using a small amount of Lok Tite™ to secure the cover in place.
Slide the sleeve in place using your fingers or the plastic pick handle. The pick handle can be used to adjust the positioning.
For more information, contact your wholesaler or Jet Hardware at 800 Hinsdale Street, Brooklyn, NY 11207. Web site: www.jetkeys.com.


