Installing a LockeyUSA Sliding Door Lock
When a customer’s sliding glass door was in need of a secure lock, the LockeyUSA 2500 lock was the hardware of choice. The previous lock was failing and replacement parts couldn’t be found for the old hardware.
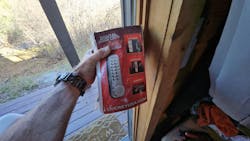
The ideal product for the job was the Lockey USA 2500 Mechanical Keyless Combination Hook Bolt Lock. The nice thing about this Lockey product is the hook. It also gives the customer a digital option. It’s a mechanical lock, but with a keypad. The mechanical keypad should work great in cold-weather environments.
The Lockey USA 2500 Lock’s features include:
- Mechanical, keyless combination hook bolt
- One user code with thousands of possible combinations
- Multiple strike plates for mortised and surface-mounted applications
- Easy-to-change combination
- Changeable handing
- Extension Kits available for doors up to 5″ thick
- Oversized knob and key override available as options
- Dimensions: 5 5/8″ L x 1 5/8″ W x 1 5/8″ D
- Total Coverage with Trim Plates: 6″ x 2″
- Throw: 3/8″
- Door Thickness: 1 1/8” to 2”. Fits doors up to 5” thick with an extension kit
- Material: Zinc-plated Steel with Teflon-coated stainless steel interior components
Installation
We start off by locking the lock and the strike plate together. Because this is a custom, one-of-a-kind installation, I lock the two pieces together and then draw out the section that needs to be cut out on the frame side of the door.
I use my multitool and cut that material out. Next, I mount the strike plate on the frame side with the two included screws. If you want a little more security, you can add a longer screw that goes much deeper in. These seem to be adequate for this installation.
Line up where the drill holes go, which we had marked like a template. Again, you simply lock the two pieces together so that you know they are going to fit. I used the back-mounted rubber plate to gauge where the holes needed to go and then marked those out with a pencil or a sharpie. You’re going to drill that material out anyway. Just be careful when drilling to make sure you drill a nice, clean hole and that the hole is large enough for the two studs to go through and the tailpiece that’s going to go through that round portion with the two little diamond shapes on it (photo xx).
Next, we put the two haves together. You can increase the thickness with the shims. They are little plastic pieces that will extend the thickness, if needed. Rubber gaskets are also included to protect the lock from the weather.
After those two halves are put together, make sure that everything functions smoothly. This installation is complete.
Wayne Winton is the owner of Tri-County Locksmith Services, located in Glenwood Springs, Colorado. For more information, check out Wayne’slockshop.com.
About the Author
Wayne Winton
Wayne Winton is the owner of Tri-County Locksmith Services, located in Glenwood Springs, Colorado.