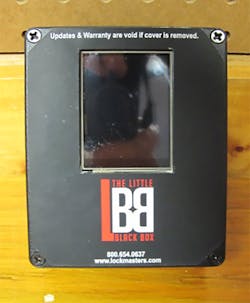
At the beginning of this year, Lockmasters, Inc. introduced a tool called the “Little Black Box” that they describe as “Industry Changing.” I recently spent several days with this amazing tool and I think that all of the hype was certainly justified. I’ve never seen a safe tool with as much promise as this one. In short, the Little Black Box (LBB) gives the safe technician a tool that will easily reset and unlock some of the most popular electronic safe locks built by Sargent & Greenleaf and LaGard in just 15 minutes! (See sidebar for application information.)
No, it doesn’t work on everything, but what it does work on is very impressive. The LBB is not designed to work on locks that are severely damaged or malfunctioning, but it can be used effectively in many situations where the dial or keypad has been damaged or destroyed. As long as the lock inside the safe is still functional and the wire that ran to the dial or keypad is accessible, the LBB can work its magic.
What is the Little Black Box?
The LBB is a compact and sophisticated standalone computer system that can communicate with and reset the combination information stored in the lock. Once the LBB is properly connected to the safe lock, it will begin resetting the software inside the lock. When the LBB has analyzed the lock, it will reset the combination and then alert the user that it has succeeded in resetting the combination. It will display the new combination(s) and then dial the combination if desired. If the lock is set for dual control, both combinations will be displayed and dialed if necessary. Once the safe is unlocked, the technician can then service or repair the safe as needed.
The LBB comes packed in a heavy-duty waterproof and shock-proof case as shown in photo one. Inside the case, is the LBB unit itself (photo-2) along with the power supply, adapter modules, and connecting cable. Let’s take a moment to familiarize ourselves with the various components, beginning with the Power supply.
The power supply ( Photo 3) holds the eight “AA” batteries that provide the LBB with 12 volts of power. Rechargeable batteries are not recommended because they do not provide as much amperage as alkaline or lithium batteries, and may not have enough power to withdraw the bolt on some locks. Lithium “AA” batteries are the preferred type. The power supply is equipped with an on/off switch, (Photo 4) a cable that can be connected to the LBB, and a magnet on the back side (Photo 5) so that the power supply can be easily attached to the safe door while in use.
The LBB unit itself does not have an on/off switch but is controlled by the on/off switch on the power supply. All of the functions of the LBB, other than the on/off switch, are controlled by a touch-screen (Photo 6) on the front of the unit. On the top edge of the tool, there is a 25-pin plug where the two different adapter modules can be attached (Photo 7). The back of the LBB has a magnet just like the power supply (Photo 8) so that both can be attached to the front of the safe when in use.
The face of the LBB has a warning printed at the top stating that “Updates & Warranty are void if cover is removed.” I’m sure that the inside of the unit has one or more “tamper evident” seals to show if the cover has been removed. I know how curious locksmiths and safe technicians are, but I would really recommend that you not try to look inside the LBB.
Both adapter modules (Photo 9) have a label to indicate which type of lock it is intended for and each has a 25-pin plug to attach to the LBB, as well as a socket on the top for the appropriate cable. A special connecting cable is supplied for LaGard locks. On S&G locks, no cable is necessary; the cable from the keypad or dial is plugged directly into the S&G adapter module.
The LBB is designed to be attached to the lock in place of the keypad. In the case of the S&G locks, that is relatively easy to do. But, on the LaGard locks, the connection to the keypad is hard to get to, so the LBB gives you two options. If you can get the keypad free of the door and release the circuit board, you can attach the cable from the lock directly to the adapter module, just as with the S&G locks. If the keypad has been smashed, or the cable was severed by would-be burglars, or you had to break the keypad free of the safe door, you can use the cable with the color-coded alligator clips (Photo 10) to connect the tool to the lock. You can also use a standard keypad cable (not included) from a LaGard lock to connect the LBB directly to the lock if you have access to it (Photo 11). With a keypad cable, you can return a lock that has been removed from a safe to service without having to know the combination stored in that lock.
Operation
Let’s walk through a typical usage of the LBB in the field. We’ll be using an S&G lock for this example. In this case, the lock has been removed from the safe, but the cable shown in Photo 12 is the same cable that would have run through the safe door and attached to the keypad. We connect the plug from the lock directly into the S&G adapter module for the LBB, but we don’t connect the adapter module to the LBB until prompted by the tool.
Next, we attach the power supply to the LBB and turn the on/off switch on the power supply to “ON.” The Lockmasters logo will be displayed briefly on the touch-screen as the unit boots up (Photo 6). Once the LBB has booted up, the Lockmasters logo will be replaced with a screen that prompts you to enter your security code (Photo 13). The security code is entered by way of the keypad displayed on the touch-screen. After you have entered the correct security code for the LBB, the next screen (Photo 14) prompts you to connect an adapter module, but it also shows a usage counter that tells you how many times the LBB has been used, the option to change the security code for the unit, and the voltage of the power supply. When the unit ships out, it is set to a default security code and the instructions urge you to set your own unique security code when you activate the machine for the first time. From this screen you can change the security code any time you like.
Monitoring the usage counter can also be useful in a shop with multiple technicians to ensure that no one is using the tool without authorization. The voltage shown on this screen should be over 10 volts; if not, you should start over after installing fresh batteries. It is possible for the LBB to defeat the lock with voltage below 10 volts, but it may not be able to withdraw the bolt or solenoid.
At this point, we will attach the adapter module, which is already connected to the lock, to the LBB. As soon as the adapter module is connected, the next screen should appear (Photo 15), indicating that the LBB is acquiring data from the lock. If this screen does not appear, that indicates that the LBB is not in communication with the lock for some reason. The most probable causes for a communications failure are loose connections, defective or damaged cabling, or the lock may not be one that is compatible with the LBB. After a few seconds, an animated data screen like the one shown in Photo 16 will appear, indicating that the LBB is analyzing the data stored in the lock.
If the LBB is successful in analyzing the data, about 15 minutes later, the screen shown in Photo 17 should appear, letting you know that the LBB is resetting the combination(s) on the lock. If all goes well, a screen similar to that shown in Photo 18 will appear, giving you the new combination(s) for the lock.
It is important to understand that the LBB does not give you the combination(s) that were programmed into the lock when you arrived. Instead, the LBB has reset the combination(s) to something totally new. You should make a note of these combination(s) before moving on. An easy and almost foolproof way to record the information displayed on the LBB screen is to photograph the screen with your phone. Tapping the screen at this point should retract the bolt on the lock, allowing you to open the safe (Photo 19).
The same basic procedure is used for resetting a LaGard lock with only minor differences in the data displayed onscreen.
Additional Considerations
The LBB manual highlights several important things to consider while working with the tool. Below are some of the things to keep in mind:
Disconnecting the LBB: Some locks are equipped with an internal battery assist that can inadvertently feed power back into the LBB. If the shutdown procedure is not done correctly, this may damage the LBB. Always follow the recommended procedure for disconnecting the tool. That procedure is to disconnect the adapter module first, and then turn off or disconnect the power supply from the LBB.
Dual Control: If the lock is set for dual control, both combinations will be reset and displayed on the LBB touch-screen. Tapping the screen to dial the combination will dial both combinations and withdraw the bolt.
Time Delay: If the lock is set for a time delay, the LBB will display that information on the screen. Tapping the screen to dial the combination(s) will begin the time delay and after that delay period has passed, the LBB will withdraw the bolt or activate the solenoid.
Important LaGard Information: For the LaGard 33E, Safegard 3600 & 3650 locks, the LBB may display information regarding different functions of the lock including: MANAGER, OVERRIDE, DUAL, ALARM, and REMOTE. These features allow the user to perform different operations with the lock such as overriding the time delay. If these features are active on the lock that you are working on, the LBB may display the pertinent information. As the safe technician, you need to understand what these features are intended for, and you should consult the operating instructions for the lock in question.
LaGard locks manufactured after 12/31/13 are of a different design than the earlier versions of that lock and cannot be opened with the LBB.
Important S&G Information: For the S&G 6120 locks, the “Master Reset Code” (MRC) may be displayed on the LBB touch-screen if the feature is active on the lock. When dialing the MRC, at least one of the digits of the MRC will be a “chord.” A chord means that the Zero and One keys must be pressed at the same time. An S&G keypad will be needed to properly dial the MRC. Refer to the S&G 6120 operating instructions for more information.
Electrical Interference: The LBB is a sophisticated electronic device and its operation can be affected by nearby electronic devices. Compact Fluorescent Lamps (CFL) in particular can affect the operation of the tool if they are located near the LBB. If any of these devices are nearby, turn them off before powering up the LBB. And, naturally, you would also want to prevent any kind of static or RF interference while using the tool, so avoid using the tool in environments that would be harmful to delicate electronics.
Who Needs the Little Black Box?
Any safe technician who regularly deals with safe lock-outs or attempted safe burglaries could benefit greatly from this tool. Conceivably this tool could save you untold hours of time spent drilling and repairing safes. Sure it doesn’t work on everything, but then again, what does? There are millions of locks out in the field right now that this tool can reset and/or unlock in approximately 15 minutes. That is a very large pool of potential customers. The tool is not cheap, but it is comparable with a high-end laptop. In the proper hands, this tool should pay for itself with a couple of uses.
As I see it, the only real problem with using this tool is being able to determine exactly what model safe lock is inside the safe. A skilled technician should be able to determine quickly if the safe is using an S&G lock or a LaGard lock, but determining exactly which lock model is inside requires some skill and knowledge of the safe in question. The instructions included with the LBB include methods for determining the model number of S&G locks from outside the safe by entering a code and listening for a beep code or other sound. In a worst case scenario, you might waste a few minutes trying to reset a lock that is not compatible with the tool. (The tool will give you an error message in under a minute if it is connected to a lock that it is not compatible with.) You can easily waste that much time setting up to drill the safe. If I was the technician, and I wasn’t sure about the lock in question, I’d attach the tool and then begin setting up to drill while the LBB is working its magic. If the LBB is successful, it’s not like I would charge the customer less!
Another consideration is that I’m sure that S&G and LaGard are taking steps right now to prevent the LBB from working on future models, but there are already so many of these locks out there, that you should be able to continue using the tool for a decade or more. I’m very impressed with this tool and I would recommend it highly to my safe technician friends in a heartbeat.
Sidebar
Compatible Locks
Sargent & Greenleaf
- 6120 Series locks (both deadlocking square bolt models and non-deadlocking spring bolt models built from 2000 and up)
LaGard locks made before 1/1/2014
- LaGard Basic Series (deadbolt and swing bolt styles)
- 33E locks
- Safegard 3600, 3650 programmable swing bolt locks
- LGCombo locks


