Choosing and Setting up a Video Surveillance System, Part II
For this second part of our series, we will continue with the basics of a standalone video surveillance system using high definition video cameras. Because this is a basic installation, we will not connect to the Internet or use a personal computer. The network video recorder (NVR) will provide all functionality. In a future article, we will discuss Internet connectivity.
This standalone, basic video surveillance system is comprised of a Lilin NVR104, Eight-Port PoE+ Fast Ethernet Switch, two cameras and a touchscreen monitor. The Lilin NVR104 has the capacity for up to four channels (cameras) of real-time recording, providing up to 24Mbps (Megabits per second) throughput. This embedded, standalone NVR supports up to two SATA hard drives and one eSATA hard drive.
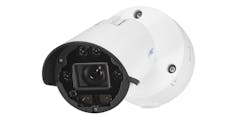
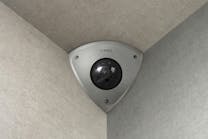
Two cameras, a Lilin IPD2220ES and a IPD6122E3.6, are 1080P HD IP Dome PoE (Power over Ethernet) cameras, having 2 mega pixel CMOS image sensors. The two cameras have true H.264 AVC/MPEG-4 part 10 real-time video compression. The H.264 AVC video compression engine supports high definition video quality, 1080P (1920x1080) resolution, bandwidth efficiency.
Each camera is connected using a Category 5 (CAT 5) cable to the Lilin Eight-Port PoE+ Fast Ethernet Switch. The Ethernet switch the throughput to the NVR and up to 30 Watts per port to power each of the PoE cameras. This eliminates the need to run separate power to each camera.
A CAT 5 cable connects the switch to the NVR. The touchscreen monitor is connected to the NVR, providing the ability to control system operation with your fingers. Additional functions include "pinch and zoom" and other smartphone-type finger operations. If a touchscreen monitor is not available, use the included USB mouse to setup and control the NVR.
Important: Always power the accessories - monitor, cameras and Ethernet Switch - before powering the NVR. When powered, the Ethernet Switch displays which ports are powered and linked to a camera.
Once the NVR is plugged in, the Ethernet Switch LEDs will illuminate for each camera. The monitor will display four symbols (shortcut keys) in the top left corner: Menu Key, Pause Key, Alarm Key and Backup Key. Using the NVR104, two icons are displayed at the bottom center, showing the cameras' screen views. They are the single view and the four-view configurations.
Pressing the Menu Key brings up the Main Menu Keys displayed along the center of the screen: Off Key, Alarm Key, Live Key, Backup Key, Record Key, Setup Key, Event Key and PTZ Key. To complete the basic setup started in the first part of this series, press Setup Key.
The screen that appears has menu settings for cameras, monitors, recording, alarm, system, network, and PTZ (Pan Tilt Zoom). The default screen is for programming the cameras starting with number one. Find WS-Discovery and press the Enter button at the right. A new screen appears. Press the IP SCAN button if not all of the connected cameras appear on this screen. The IP Scan feature searches for available cameras within the system. The second camera’s image appeared on the screen.
Sometimes it is necessary to make some changes for the camera to appear. A call to Lilin Technical Support helped to resolve the second camera. To simplify identifying each camera, use "Get Snap" to take an image from each listed camera.
Once all of the cameras have been listed and identified, the next step is to press the "X" in the top right corner, which will return to the previous camera screen. Note: Every time the "X" in the top right corner is pressed, it returns to the previous screen.
It is a good idea to name each camera, usually giving it a location. For this article, we will change the cameras' names from CAM01 to Overall View and CAM02 to Fixed Point, since this setup is in a residence. Note: Normally it is recommended to name the camera for what it sees.
The Overall View camera, the IPD6122E3.6, is vari-focal type having an angle of view of 79.3° ~ 29.8° H, 59.4° ~ 22.4° V and 99° ~ 37.3° D, which can be adjusted to view the general movements of people or to narrow the vision for identification of a person's face. The Fixed Point camera IPD2220, has a fixed angle of view of 70° H, 51° V and 89° D. Plus both of the cameras produce two mega pixel output, which is more than sufficient to identify a person or object. Once the names of the cameras have been named, exit the Setup Key and return to the Live View.
The images the camera views should be on the Live View, along the top of the screen, each taking approximately one-quarter of the screen. If this were an actual installation, we would make sure the cameras were installed in the proper locations to provide the desired image. The Overall View camera angle of view is adjustable. Adjusting the image will provide the ability to widen or reduce the viewable area. The Fixed Point camera must be positioned close enough to provide the desired image.
Note: The NVR104 can provide up to 64X digital zoom and can freeze images in live and playback modes. While frozen, the NVR is continuing to record.
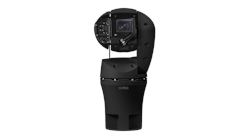
If any of the cameras are equipped with PTZ, the NVR104 can control the movement of the camera and lens. Go to the Main Menu and press the PTZ Key. A virtual controller will appear and changes to the image can be made.
When the images meet expectation, the next series of steps will be to set the record time. The Record Setup Menu is used to determine the record quality (resolution), frame rate (up to 25 Frames per Second), audio, schedule and type of recording. Each camera is programmed separately for its specific application.
The amount of time that can be recorded is determined by the numbers of cameras, each camera's output, recording schedule, whether some are all data can be overwritten and the size of the hard drive(s) controlled by the equipment. The Lilin NVR104 can have up to eight terabytes (TB) of hard drive space.
To help understand the amount of time that can be recorded on any size hard drive, consider a two mega pixel camera recording at 25 FPS at full HD 1920x1080 HDMI output. Running this camera for 456 hours (19 days) will fill a 1 TB hard drive.
in addition to programming continuously or at scheduled time, a Lilin video surveillance system can record for specific applications. These include alarm recording, weighted recording, motion detection recording and manual recording.
The Lilin NVR104 can be programmed to send .JPEG snapshots to an FTP server or email address when an alarm event is triggered when connected to the Internet.
Alarm recording is programming the video surveillance system to when an alarm occurs, the time pre-set before the alarm, the alarm and the post alarm time recordings are saved. For example, when an alarm occurs, the NVR can be preset to 30 seconds before the alarm and 60 seconds post alarm. This amount of time will be recorded each time an alarm occurs. When there is no alarm, the system will continuously rewrite over itself after a period of time. Motion detection recording is similar to alarm recording, only a motion detector is used to initiate the recording process.
Weighted recording is used to avoid having to record over recorded materials by pre-setting the video surveillance system to increase to a predetermined recording rate once an alarm is detected. When there is no alarm, the system will record one frame per second (FPS). At one FPS, a series of motion images can be seen, not enough to determine an activity, but enough to have a general idea of what is happening.
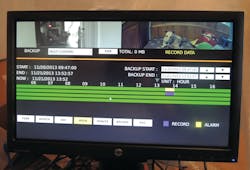
Recording using the Lilin NVR104 is accomplished using a schedule table that is displayed at hourly intervals seven days a week beginning at one second after midnight.
To backup or export the video, a DVD recorder, hard drive or dedicated space on the NVR hard drive can be used. Recording can be accomplished for any or all cameras at the desired times for the desired amount of time. Backup space is limited to the capacity of the backup device.
In the next installment of our video surveillance series, we will discuss choosing the right camera for different applications. Read part 1 of the series here: www.locksmithledger.com/11076301.
For more information, contact your local locksmith distributor or Lilin USA, 11836 Clark Street, Arcadia, CA 91006 Telephone 626-930-1000 Web Site: www.meritlilin.com.
Glossary of Terms
Category CAT 5e cable - Standardized cable for Gigabit Ethernet bandwidth applications up to 100MHz over distances up to 328 feet (100 meters).
H.264 AVC/MPEG-4 part 10 – Industry standard video compression format capable of outputting higher quality video at lower bit rates.
Throughput – a measurement of how much data can be transferred over a network in a given amount of time.
