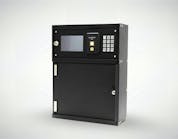
Advanced Diagnostics' (AD) MVP Pro multiple vehicle transponder programming tool builds on its predecessor, the MVP Classic, providing additional capabilities including a large LCD touch screen, simplified keypad navigation, more memory (64MB) to run larger software programs and a USB interface for fast software downloads.
The MVP Pro “Pay As You Go” key programming system uses electronic tokens to program keys and some vehicle remotes. Using this payment method, the cost of the unit is less, and there is no charge for software updates. The electronic tokens can be downloaded via the Internet. Token fees vary depending upon the number purchased.
Like its sibling, the TCODE Pro, the MVP Pro uses plug-in adaptors (dongles) that have specific vehicle manufacturer/model information. These eight color-coded dongles configure the MVP Pro for programming a vehicle. This includes configuring the number of cables required when servicing vehicles equipped with an OBDII port.
In addition to programming/erasing transponder keys, fobs and remotes, the MVP Pro is capable of identifying the ECU, battery voltage, reading and clearing fault codes, displaying live data and extracting pin codes and mechanical key codes (on specific vehicles).
To prevent unauthorized access, the MVP Pro is equipped with password protection. A six-digit password must be entered to access the device each time it is powered on. In addition, the password is required for updating software, etc.
Note: When servicing a vehicle, always mount the proper dongle and cable before turning on the AD MVP Pro.
The power button is located in the top right corner. To turn on or off the MVP Pro, press the power button for a bit more than one second. Once powered, the main menu will appear. The screen is divided into four quadrants. The top left quadrant is for selecting a vehicle for programming/erasing transponder key/fob or remote. The top right quadrant is for downloading updates and software. The bottom left quadrant is for calibrating the LCD. The final quadrant displays the battery voltage in the vehicle in this screen. This way you know if there is sufficient voltage to provide the service. Voltage should be at least 11.98 volts. If the voltage is less, use a jumper battery. If the vehicle’s battery is dead, disconnect the cables and connect the jumper battery to just the cables so the dead battery will not drain voltage.
Touch the screen in the top left quadrant or press the F1 button. Enter the six-digit password and press the check. If the correct password has been entered, press the enter key. The next screen indicates the number of tokens available. The following screen indicates the option for memory. Select Memory 1 Standard.
For this article, we will program a 2005 Ford F150. This pickup uses the Ford 8-cut lock mechanism and an encrypted transponder using the PATS 3 CAN system. The original equipment Ford encrypted key blank is manufactured by STRATTEC. The part number is 599114.
The next series of steps is to select the vehicle manufacturer (Ford), location (U.S.A.) and system (PATS 3 CAN). The LCD will display the ECU. For the Ford F150, it is PATS 3 CAN (P.C.M.). Touch the OK.
The next screen will say: SWITCH IGNITION ON.
Insert the key to be programmed into the ignition lock and turn to the ON position. Press the check mark. The Diagnostic Menu will appear providing the options: ECU IDENTIFICATION, FAULT CODES, ACTUATORS, SPECIAL FUNCTIONS.
Highlight Special Functions and press the check mark. The next Diagnostic Menu will offer: CLEAR/ERASE PATS, ADD KEY, KEYS PROGRAMMED.
Highlight Add Key and press the check mark. The next screen will read ONE TOKEN WILL BE USED.
Press the check mark to program a transponder key. The next screen will appear:
Minimum keys required: 2
Timed Access
Clear time 10:00
Press the check. The next screen will be:
PATS 3 CAN
GAINING ACCESS
TIME REQUIRED 10:00
ACCESS STATUS
IN PROGRESS
BACK TO ABORT
Follow the screen prompts to program keys. If there are additional keys to program, insert the next key into the ignition and turn to the ON position. This key will be programmed. Continue to program all keys. When finished, disconnect the MVP Pro from the vehicle.
Once all keys have been programmed, wait two minutes for the system to cycle out of programming mode. Then test the new key(s) and any existing keys to make sure they can be used to operate the vehicle.
Some locksmiths may not be computer comfortable. This should not stop you from purchasing an Advanced Diagnostics MVP Pro. Software can be updated using a computer or by sending the machine to Advanced Diagnostics. There is no programming fee. If you are willing to have the programmer shipped back, FedEx Ground, shipping is free.
The MVP Pro warranty is one year from the date of purchase.
For more information, contact your local locksmith distributor or AD USA, 1435 Huntington Ave., Suite C, South San Francisco, CA 94080. Telephone: 650-876-2020. Web Site: www.tcodeusa.com


