Keyless Ride Keyless Entry Remotes: One K2 Forge Remote Can Control Two Vehicles
The age of the automotive remote is upon us. Just about every new vehicle is equipped with a remote as most vehicles began eliminating the passenger door lock in the late 1990s. It seems the only cars that do not have remotes as standard equipment are the less expensive, base models, those equipped with a manual transmission and hand crank windows.
Vehicle entry remotes like any other electronic device have two issues. First, the battery begins to lose charge. Instead of immediately replacing the battery, the user pushes harder to get that extra bit necessary to unlock the vehicle. Unfortunately pushing harder and harder can damage the circuit board, solving the battery problem.
A second problem is the remotes have a limited operational life. With the economy and employment issues, people are not trading in their vehicles. According to R. L. Polk, March 30, 2010 the average age of cars are 10.6 years and trucks are 10.2 years. (Web Site: https://www.polk.com/company/news/polk_finds_more_vehicles_scrapped_than_added_to_fleet)
This combination of factors makes vehicle entry remote replacements a necessity. People have several choices. They can go to the dealership and pay a premium price, order the remote through the Internet or go to a locksmith.
Most consumers are not “do it yourselfers.” This limits the number of people who will order the remote through mail order or the Internet, as the remote must be programmed to the vehicle.
The car dealers have a recommended price, usually quite steep.
The locksmith becomes the reasonable alternative as locksmiths can sell original equipment and aftermarket vehicle entry remotes.
For this article, we will discuss the Keyless Ride K2 Forge Universal Keyless Entry Remotes. According to Keyless Ride, these rolling code technology remotes are compatible with approximately 70 percent of the North American vehicles equipped with a vehicle entry remote. According to the K2 Forge Application Guide version 1.0, e more than 850 make, model and year vehicles can be forged at the time of writing this article.
Keyless Ride K2 Forge remotes are non-vehicle or manufacturer specific, which means the one vehicle entry remote, can be programmed to any of the compatible vehicles. The K2 Forge eliminates the need to stock specific model remotes or explain to the customer it will be several days until their remote can be obtained.
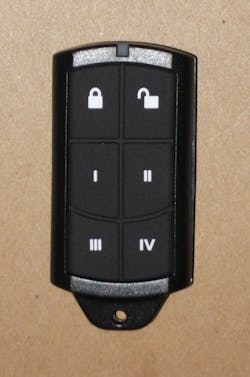
The K2 Forge comes as a printed circuit board (PCB), shell and generic rubber pad. To set up a K2 Forge remote to operate a specific vehicle, there are 19 different button rubber pad configurations. The button configurations range from a two button, up to a six button vehicle remote. Depending upon the features of the vehicle, the rubber pad can have lock, unlock, alarm, trunk open, tailgate window, tailgate open, tailgate close and/or remote start. To create functional similarity for the K2 Forge remote with the original equipment remote, the Application Guide includes the appropriate button configuration part number.
The “magic” behind the printed circuit board is the programmer that when a particular vehicle, model and year are chosen, downloads the proper software for the K2 Forge remote to operate those functions available with the vehicle.
For this article, I was loaned a Keyless Ride K2 Forge Starter Kit. The kit contains programmer base and cable, seven K2 Forge circuit boards, batteries and shells, software and the accessories assortment.
Programming is accomplished using a Windows-based computer. The requirements are minimal, XP, Vista, or Windows 7, 1GB RAM, 20 MB available hard drive space, a USB port and a high speed Internet connection. From this kit, seven remotes can be programmed and assembled.
I was given the opportunity to program two K2 Forge remotes, each with two vehicles. The vehicles are a 2003 Honda Civic and a 2002 Honda CR-V. The end users liked the idea of having only one remote with the capability to remotely unlock either vehicle. The two remotes and the two keys as well as the required keys were a problem trying to carry everything in a pants pocket or small purse.
Both of these vehicle’s remotes are On-Board Programming (OBP) capable. Just about all automotive keyless entry remotes are either OBP or require a programming device (scan tool) to program them to a vehicle. Some can be programmed using either method.
K2 Forge Software
The first step to programming a K2 Forge remote is to install the software onto the computer. Follow the step-by-step directions in the manual or provided CD.
Once successfully logged in, the K2 Program window appears on the screen. I inserted the printed circuit board into the programmer in the proper direction (LED facing away from screen) and side (battery side down), matching the illustration on the programmer’s front. Make certain the PCB is properly seated in order to make a good connection and let the cover door close slowly. The green LED should illuminate. If the red LED illuminates, the PCB is not properly seated.
When the green LED illuminates, choose the first vehicle year, make and model. Depending upon the number of remotes available for this particular vehicle, it may be necessary to select a remote different than the default. For the 2003 Honda Civic, there are two remotes. The default remote, 6370, was the correct remote. It was identified by the FCC ID as indicated by the Special Notes in the Application Guide. Other remotes can be identified visually by the configuration of the customer’s remote. Keyless Ride offers technical support as an alternative.
Once the first vehicle has been chosen, the programming method is displayed in the window. At this time, if it is only one OBP vehicle being programmed, the programming instructions can be viewed and printed.
I then entered the second vehicle’s information, which was also On-Board Programming. The programming method is the same for both vehicles.
I then pressed the Forge button and the remote circuit board was programmed for the two Honda vehicles. Programming was a few minutes, less if only one vehicle is programmed into the circuit board. I forged a second remote so each person had a remote. When two vehicles are programmed into the circuit board, the first vehicle is always the operational remote.
The next step is to install the battery onto the circuit board. If properly programmed, when you install the battery, the LED flashes green and red to indicate operation.
Assembling The Remotes
Next, assemble the remotes. The K2 Forge comes with a generic rubber pad. As an alternative, specific application rubber pads are available in the Keyless Ride Accessories Kit. For this application, I chose the proper three-button rubber pad, number 4B for the 2003 Honda Civic. The correct rubber pad is indicated in the Application Guide under the “BTN CONFIG”. The 2002 Honda CR-V used the 4C, a four-button rubber pad.
Note: When two vehicles are programmed, unless both vehicles have the same number and button configuration, there is a choice of the vehicle with the fewer features using the button pad for the vehicle or the button pad for the vehicle with the greater number of buttons.
The rubber pad is slid over the circuit board with the LED facing the clear end of the pad. The LED flashes when a button is pressed, giving visual indication of operation. The clear end of the pad aligns with the notched end of the shell. The clear tab on the pad slides into the opening in the cover of the shell. The two halves are pressed together and snap into place.
Because these two remotes have only three or four buttons, they can use the four button face for the front of the shell. The four-button face covers the area where the fifth and sixth buttons would be.
Note: A coin slot in the end contains the opening for the key ring. To disassemble the K2 Forge, slide a penny into the slot and twist gently. The two halves of the remote separate for disassembly.
Programming
To program the remotes to the vehicles, I began with the number one vehicle, the Honda Civic. According to the programming sheet I printed, the system will accept up to three remotes.
When the vehicle’s onboard computer system enters the programming mode; all learned remote codes are erased, enabling new codes to be recorded. This means that all remotes must be available and programmed at the same time.
To enter the programming mode for both of these Honda vehicles, insert the key into the ignition lock and have all remotes to be programmed easily accessible.
To enter the programming mode, the following three steps must be performed quickly three times.
- Turn the key in the ignition to the “On” position. Instrument panel illuminates, starter does not engage.
- Press the unlock button for about one second and release on the first remote.
- Turn the key in the ignition to the “Locked or Off” position. Do not remove the key.
These three steps are repeated three times, one right after another. If there is too much time, the computer will not enter the programming mode.
Once the three steps have been repeated, within five seconds turn the ignition to the “On” position.
Press the unlock button on the same remote and release. The power door locks should cycle, from lock to unlock. This confirms the system is in the programming mode.
Within ten seconds, press the unlock button on the same remote and release. The power door locks will cycle to confirm that the system accepted the remote’s code.
Repeat this step to program the second and if applicable third remote.
Immediately, turn the key back to the “Locked” position and remove. This exits programming mode.
At this time, test the operation of each programmed remote to be certain all of the functions are operational.
Once the remotes are programmed to the first vehicle, they must be switched to operate the second vehicle. If this step does not occur, and the second vehicle is programmed, the programming of the first vehicle is lost.
When two vehicles are programmed, press and hold the 3rd and 4th buttons simultaneously for two seconds. If the remote is set to vehicle one, the LED will flash red three times when switching to vehicle number two. If the remote is set to vehicle two, the LED will flash green three times when switching to vehicle number one.
The customer liked the idea of only carrying one remote and being able to use it for either vehicle. This is specifically advantageous for Honda vehicles using the high security lock mechanism as the driver’s door lock begins to wear out over time if the key is used to unlock the vehicle.
The circuit board can be reprogrammed three times, if the customer changes vehicles or if an error or problem occurred after programming.
Contact Keyless Ride at Web Site: www.keylessride.com/locksmiths for specifics on is financial arrangements and registration required in order to program remotes.
Keyless Ride Marks 10th Anniversary
This past year (2011) marked a new milestone for KeylessRide as it celebrated its 10th year in business. KeylessRide has grown from a boot-strapped, start-up operation out of its founder’s home to become one of the nation’s leading suppliers of keyless entry remotes, transponder keys and programming tools. The company has offices in central Texas and northern California along with a network of international distributors. Locksmiths have looked to KeylessRide for its leading-edge technologies, reference tools/training, turn-key solutions, and excellent customer service. The company wishes to thank all the locksmiths and the industry-at-large for their business and support.


