The term “total opening solution” is used more frequently in the contract hardware business. Simply, it’s an attempt to sell the entire opening: door, frame, hinges, locks, etc.
Locksmiths have known for some time that they should consider the entire opening whenever they go to a job. For one, it’s a good way to add revenue through an upsale. Instead of installing, say, just a cylindrical lock, you also sell and install a hinge, latch guard or door closer — or all three — as well as a new door.
For another, it might be a matter of life safety. If a door, particularly an egress door, is failing, it’s essential to point that out to the building manager or owner.
Make no mistake: A total opening replacement is a big job. But if done the right way, the replacement can improve the aesthetics of the building as well as the security.
Locksmith Ledger recently got a chance to observe such a job at a commercial building. Here’s our report:
The Job
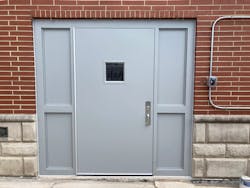
The installation was part of a three-door work order by Ashland Lock & Security Solutions in Chicago for CPP Schaumburg, the property owner, at an indoor golf course in the suburbs. The door in question was a back egress door that leads into a parking lot. Although patrons of the establishment wouldn’t use the door unless there were an emergency, they all can see it from where they park their vehicles.
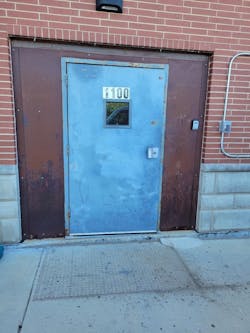
And the previous opening was an eyesore. Ian Mullally, the building manager, says his company has owned the building for two years, and the door in questions was “a disaster.” He noted that it was possible for “critters” to make their way indoors through this doorway.
Ashland’s lead technician on the job, Jeremy Boyd, who has been in the locksmith business for 22 years, puts it a bit more diplomatically:
“This was a rough one,” he says of the old door and frame. “It looked like there was constant repairing, like it was kind of a custom job.”
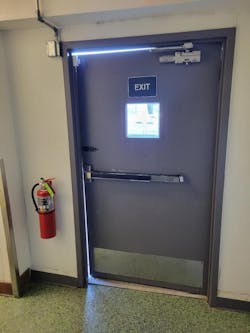
The door was a single door that appeared to sit in a makeshift wooden frame that held metal panels that showed signs of rust where small animals could enter. (Image 1) The door closer had lost its cover; and the exit device end cap had come loose. The previous strike didn’t work. In fact, a simple mechanical door latch had been added to keep the door locked. (Image 2)
Ashland was hired to redo the entire opening. That included a new frame, door, hinge, door closer, exit device, keyed cylinder and electric strike, as well as carting off all the old equipment and debris.
The Demolition
Ashland’s two-person crew — Boyd is assisted by Jeremy Nelson, who has been in the business nine years — were asked to save only the interior vinyl paneling and trim above the door frame as well as an unused door-position switch and exit sign. Those items were taken down and set aside. After the new equipment was installed, the old door, panels and hardware would be loaded into the trucks and hauled off for proper disposal.
Yellow caution tape was applied to an interior stairwell that led down to a service area, but, because the door being replaced was an egress door, an interior door that led from the establishment wasn’t blocked.
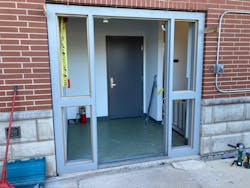
The door was removed and the frame, along with the exterior paneling, torn down and stacked up out of the way. This included the weatherstripping and sealant. (Image 3)
Because installing a new door frame would require that it fit flush with the brick and concrete exterior, the demolition required taking out or even cutting down old nails and bolts. (Image 4) It also required chipping out any of the interior ceramic floor or concrete foundation that could prevent the door frame from being aligned properly.
Preparing the Frame
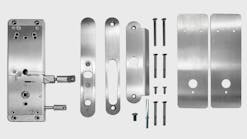
The new frame is a hollow metal welded frame that has sidelites for a 48-by-84-inch hollow metal door, both made by Ceco Doors. The door, frame and metal panels for the sidelites are fire-rated. Boyd says Ashland typically adds hardware to a door in the shop to save time, but in this case, the only thing that had been preinstalled was the Pemko mortise continuous hinge, a significant upgrade from the previous door’s three standard hinges.
Boyd and Nelson prepped the frame for the door closer and electric strike. Nelson used the mounting plate of the Arrow DCN500 door closer to mark where the frame should be drilled before bolting the mounting plate onto the frame. (Images 5 and 6)
Boyd then snaked the cable for the electric strike through the frame. Although Ashland wasn’t contracted to provide the access control for this door, it still had to prep the strike for the provider.
The low-voltage cable used tends to “bunch up” when trying to snake it through a long distance, so Boyd employed a trick to speed up the process. He first snaked copper wire from a spool he had at home through the top of the frame to where the hole for the strike would be mounted and then tied the cable to the wire before pulling it through. (Image 7)
Installing the Frame, Door
The frame was loaded into the opening and held in place by makeshift shims that were cut from balsa wood boards. (Image 8) A level that has tape affixed to it was placed at the crossbar of the frame and a plumb bob hung down one side — all to ensure that the frame remained straight and flush during the work.
Boyd advises cutting a hole at the top of the frame for the access control cable to be run through any conduit, as it would be for this door, at this point. Doing so after the frame has been secured can result in the cable being pinched and some difficulty in getting it back in the frame and then out a proper opening.
The next task was to bolt the frame into the concrete. However, the sidelites added some difficulty to the task in that the corded power drill typically used for the task was too big to allow for a straight bolting down.
The solution: Inserting the bit in the anchor point before attaching an extender on a cordless drill driver to begin making the hole until it was deep enough to where the drill driver could do the rest. In this fashion, three 3/8-inch bolts were applied to each side of the frame. (Image 9)
The two bars at the base of the frame in the doorway were snipped in preparation for the threshold and door, and the frame was bolted to the concrete foundation.
Installing the Door, Hardware
While Boyd bolted the frame into place, Nelson prepped the Pemko threshold to fit the base of the doorway. He used tape to mark his saw cuts and to prevent metal shards from flying up and then filed down the edges. After a bit more chipping of the floor, the concrete was drilled in preparation for attaching the threshold.
Two boards were used to prop the door, which has a small window and had been predrilled on both sides for the exit device and trim, while the attached continuous hinge was anchored to the frame. (Image 10)
Nelson then completed the installation of the door closer by assembling the closer arm, bolting the closer to the door and bolting the arm onto the frame before attaching the arm to the closer. (Images 11 and 12)
He then adjusted the closing speed and tested the door several times to get the preferred closing time of 7 seconds.
Installing the Locks
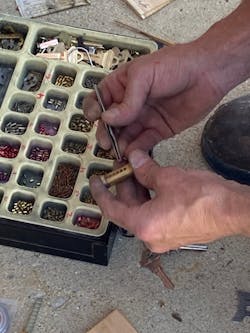
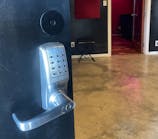
Boyd began with the keyed cylinder for the exit device trim, a Kaba Ilco rim cylinder that has a Schlage keyway. Boyd removed the tailpiece and pinned the cylinder on the fly. (Image 13) He says this is something he does a lot of “as a service to the customer,” particularly if they have a masterkey system in place.
He then reassembled the core and reattached the tailpiece before attaching the cylinder to the exit trim, an escutcheon pull, and the trim to the door. (Images 14 and 15)
Boyd advises testing the fit of the cylinder tailpiece with the exit device before installing the exit device. That way, if an adjustment has to be made because the cylinder “bottoms out” and binds when someone tries to turn the lock, you don’t have to take apart the exit device to make the fix.
After noting some binding, Boyd snipped a bit of the tailpiece and added a 3/32-inch cylinder collar, which resolved the issue.
The exit device is a Von Duprin 98/99 rim exit device that includes a night latch function, and after prepping the frame and door, Boyd mounted the exit device on the door before reattaching the cover and end cap. (Image 16) A test indicated no further binding.
Finally, Boyd turned to the strike, an HES 9500 surface-mount rim electric strike. After prepping the frame, Boyd crimped and connected the wires from the preinstalled cable to the wires that would power the strike. (Image 17)
The strike plate then was attached to the frame with the wiring pulled taut through the frame and the cover placed. A test of the door showed everything to be aligned and in working order, and three door stoppers then were added to the frame. At his point, Mullally was handed the keys to the cylinder.
Finishing the Frame
While Boyd tended to the locking devices, Nelson applied the four steel panels and the trim to the frame. (Image 18)
Two things were particularly notable about this procedure:
- Nelson taped padding to his drill, changing the side depending on the direction of the screws, to prevent scuffing.
- The screws necessary to complete the task were held in a two-by-four that had been prepped in advance by drilling enough holes to hold the necessary number of screws for the panels. The screws had been painted to match the frame and door. (Image 19)
The threshold then was attached to the foundation. Cleanup had been an ongoing part of the entire process, but Boyd took particular care to clean the area in preparation of the sealant to help with the binding but also to maintain a professional appearance. (Image 20)
“You don’t want to leave a bunch of junk showing,” he says.
The concrete was drilled, with the holes in the threshold used as a template, and sealant was applied before the threshold was bolted to the foundation.
At this point, the shims that had been used to hold the frame in place were cut, and a polyurethane rope sealant was applied to the remaining gaps on all three sides. (Image 21) Inside, weatherstripping for the door was cut to length, filed and applied. (Image 22)
Final Touches
The essential work of the installation now being complete, the rest of the time was spent on reconnecting and reattaching components that had been taken apart during the demolition, starting with reapplying the vinyl paneling and trim above the frame. (Image 23)
Nelson then reattached the old door contact while Boyd worked on the final exterior caulk for the seams between the frame and the brick and concrete exterior. (Image 26) He used Frogtape to mask the brick and frame, pulling straight down slowly when finished to maintain a clean, tight caulk line. (Image 27)
Weatherstripping for the door’s exterior at the bottom was applied, and the old exit sign reattached to the door. (Images 28 and 29)
The last steps before the final cleanup were to apply any touchup paint, as necessary, to cover marks or smudges and test the door closer once more for backcheck, before attaching the cover.
It’s worth noting that the final steps took more than half as long as the first 95% of the job, but that’s the difference between getting a job done fast and getting it done right. As Boyd notes, “you want it to look professional.”
It certainly did. (Images 30 and 31) Total time: 6 hours.
Will Christensen | Senior Editor
Will Christensen is senior editor at Locksmith Ledger International. He has been an editor and reporter at magazines and newspapers for more than 30 years.
